Addon Development
This page is an in-depth tutorial on how to setup an environment for creating Addons for TFC+. It will also show you how to make a basic addon for demonstration purposes, from which you can grow your own addon, and give you some general tips and tricks. It will not go in-depth about programming, or making substantial changes to the game as those are complex topics that have been better covered elsewhere.
Previous knowledge of Minecraft modding is very helpful for making Addons but this tutorial assumes no prior modding experience. While programming knowledge is not required in order to follow this tutorial, any code shown here will be explained only very briefly. If you do not know any programming, then Minecraft modding might be a good place to start, in which case this tutorial will help get you started.
Setting everything up can be very tricky and can take longer than you might expect, so please follow the tutorial carefully to make sure everything works properly. You can always start a section over if you mess up.
A Note on Programming Languages
Minecraft, and TFC+ by extension were written in the Java programming language. This is also the language you will probably use to write TFC+ addons. Although Java is the most popular language choice for making Minecraft mods, any other language that can compile to JVM bytecode can in theory be used. Popular alternatives include Scala and Kotlin.
Through this tutorial will be setting up and using Java, both because it is the most popular choice, and because integrating it with Minecraft and TFC+ is easier than with other languages. If you use another programming language most of these steps will be similar, however there may be extra in-between steps that you need to follow for your particular language of choice. These extra steps are outside of the scope of this tutorial.
Downloading the Java JDK
In to make Minecraft mods, you first need to download and install the Java JDK 1.8. Download the last version of the appropriate JDK for you system Here and install it.
If you are on Windows, you can confirm that the JDK is successfully installed by going to the C:/Program Files/Java folder, you should see a sub-folder called jdk1.8.0_XXX where XXX will depend on the exact version of the JDK you installed. On MacOS, this should be in /Library/Java/JavaVirtualMachines, and on Linux it should be in /usr/lib/jvm.
Setting up the PATH
You need to make sure that Java is accessible from your PATH. This is necessary to make sure later steps will work properly.
- If you are on Windows, open up the start menu and type "Command Prompt" into the search bar, and open up a command prompt. On a Mac or Linux, open up a terminal.
- Type
java(all lowercase) into your command prompt/terminal. - Press Enter.
If no errors show up on your terminal, and the output looks like what is shown below, then Java is accessible from the PATH and you can skip forward to the next sub-section.
If an error message appeared in your terminal then you need to add Java to your PATH before you can continue. First, locate the bin directory of the JDK, which should be inside of the directory you installed the JDK earlier. For example C:/Program Files/Java/jdk1.8.0_XXX/bin. Copy this path to the clipboard. Then, follow the operating system specific instructions below.

Adding Java to the PATH on Windows
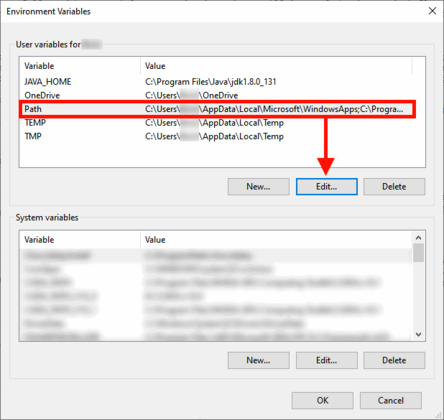
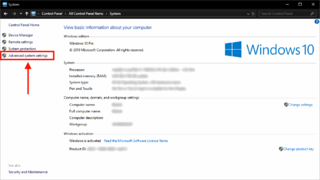
- Open up the Control Panel and then click on "System"
- Click the "Advanced system settings" button on the left pane.
- Then from the "Advanced" tab click on "Environment Variables..."
- Locate the "Path" variable and then click on "Edit...".
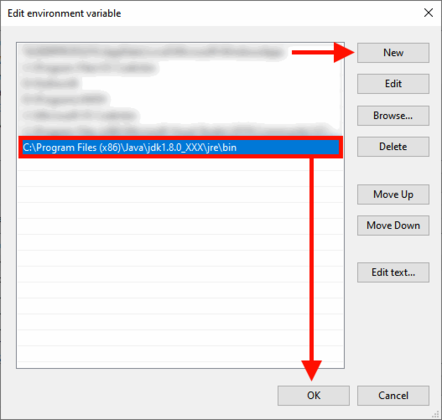
- In the window that pops up, click on the "New" button and then paste in the
C:/Program Files/Java/jdk1.8.0_XXX/binpath that you copied earlier, and press ENTER. - Restart your computer so that Windows can properly register the new PATH. Then, open up another Command Prompt and run
javaagain. You should get no errors this time.
-
 Step 2
 -
 Step 4
 -
 Step 5


Adding Java to the PATH on Mac or Linux
- Open
~/.bash_profilein a text editor. - Add the following line at the end of the file
export PATH=$PATH:/usr/java/jdk1.8.0_XXX/bin. - Save and close the file.
- Restart your computer.
After restarting, open up another terminal and run java again. You should get no errors this time.
Setting up JAVA_HOME
You now need to set your JAVA_HOME variable to point to the JDK folder you set up earlier, for example /usr/java/jdk1.8.0_XXX. Copy the path to this directory, and then follow the operating system specific instructions below.
Creating JAVA_HOME on Windows
- Open up the Control Panel and then click on "System".
- Click the "Advanced system settings" button on the left pane.
- Then from the "Advanced" tab click on "Environment Variables..."
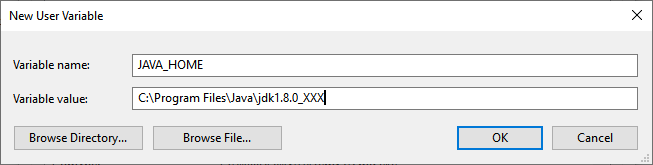
- Now click on the "New..." button.
- In the window that pops up, enter "JAVA_HOME" under the "Variable name" field, and paste the path to the JDK you copied earlier into the "Variable value" field. It should look something like the screenshot below.
- Restart your computer.
- To confirm that JAVA_HOME is set up properly, open up the Command Prompt and run
echo %JAVA_HOME%. The output should be the same as the path to the JDK.
-
 Step 2
 -
 Step 5

Creating JAVA_HOME on Mac or Linux
- Open
~/.bash_profilein a text editor. - Add the following line at the very end
export JAVA_HOME=/usr/java/jdk1.8.0_XXX. - Save and close the file.
- Restart your computer.
To confirm that JAVA_HOME is set up properly, open up another terminal and run echo $JAVA_HOME. The output should be the same as the path to the JDK.
Downloading Forge
Minecraft Forge is what allows making and running Minecraft mods, so we will need it for making addons. You will need the "Src" version of Forge, which is different from the version used to play the game. To download the appropriate version of Forge, go Here and click on the "Src" download button for the latest version of Forge for Minecraft 1.7.10 as shown below.
The Forge file you downloaded should be a zip file, for example forge-1.7.10-10.13.4.1614-1.7.10-src.zip. Extract the contents of this zip file to a new directory. You can call this directory anything you like, but for the purposes of this tutorial we will be calling it TFCAddon.

Setting up Gradle
- Open up the
TFCAddondirectory that contains the extracted Forge Src. - Open the
build.gradlewfile inside of this directory with a text editor like notepad. - Go to line 3 in this file, and replace
mavenCentral()withmaven { url = "https://repo1.maven.org/maven2/" }without the surrounding double quotes. - Save and close the file.
- Open up the
gradle/wrapper/gradle-wrapper.propertiesfile in a text editor like notepad. - Go to line 6, and replace ".../gradle-2.0-bin.zip" with ".../gradle-3.0-bin.zip".
- Save and close the file.
- Now, open up a command prompt/terminal in the
TFCAddondirectory. On Windows you can do this by holding shift and right clicking in the directory, then clicking on "Open PowerShell window here". - Run
./gradlew setupDecompWorkspace, and wait for this command to finish. This may take up to 5 minutes.
If you get any errors in the terminal, then make sure you have followed the tutorial properly up to this point. Specifically, make sure you have set up your PATH and JAVA_HOME variables properly, and that you have replaced lines 3 and 6 in the respective files as said above.
Downloading the TFC+ Source Code
You will need a special deobfuscated version of the TFC+ source code in order to develop Addons.
- Go to the TFC+ download page Here.
- In the "Files" tab, scroll past the "Main File" section and into the "Additional Files" section.
- Download the "deobf" version - not the "src" version. The downloaded file should be called something like
[1.7.10]TerraFirmaCraftPlus-deobf-X.XX.X.jar - Open up the
TFCAddondirectory where you extracted the Forge Src. - Create a new sub-directory called
libs. This exact name is very important. - Move the deobfuscated TFC+ source jar into the newly created
libsdirectory.

Making Sure Everything is Working
If you go to TFCAddon/src/main/java/com/example/examplemod/ExampleMod.java you can see that Forge Src already comes with Java code for a trivial mod that prints out the name of a dirt block. We will now build and compile this example mod to make sure everything is working, and later on we will edit it to make our own mod.
- Open up a terminal in
TFCAddon - Type
./gradlew buildinto the terminal. This may take a minute, and the output will be long but should end with "BUILD SUCCESSFUL". - Type
./gradlew runClientinto the terminal. This will actually open up and run Minecraft with TFC+ and the example mod. - If you go to the Mods tab on Minecraft's main menu, and scroll all the way down, you should see both TerraFirmaCraft+ as well as the Example Mod listed.
Congratulations! You just made your first TFC+ addon. It doesn't do anything yet but you can already start editing ExampleMod.java to make it do whatever you want.
You can test your Addon by running ./gradlew runClient in the terminal. You can find the jar file of your mod in the TFCAddon/build/libs directory, which you can place in your Minecrafts mods directory to try it in your own Minecraft game setup.

Setting up an IDE
This step is highly recommended for beginners, however you can skip to the next section if you know what you're doing and prefer to use a simple text editor like Notepad++ or Visual Studio Code for writing Java code.
Most people find it easier and more comfortable to write Java from an Integrated Development Environment (IDE) and this step will explain how to get one set up. The rest of the tutorial also assumes that you are using an IDE.
The two most popular IDEs for Java are Eclipse and Intellij IDEA. We will be using Intellij IDEA in this tutorial.
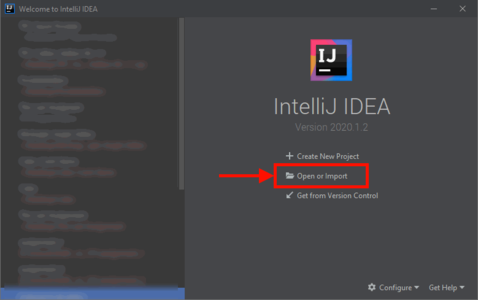
- Download Intellij IDEA Here and install it.
- Open a terminal in
TFCAddonand run./gradlew idea. - Open up Intellij IDEA. You should get a window like in the screenshot below.
- Click on the "Open or Import" button.
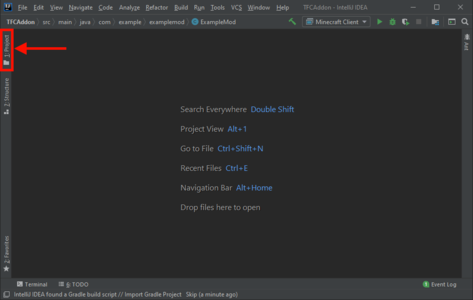
- Navigate to the
TFCAddondirectory, click on it, and then press "OK". Wait for intellij to open the project. You should now see a welcome screen similar to the one below. - To see all of the files in your project, click on the button on the left edge of the window - it can be a bit difficult to spot.
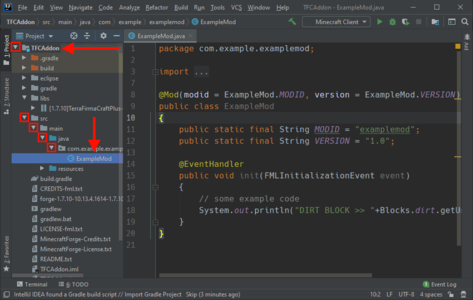
- Expand the TFCAddon project by clicking the little upside-down triangle next to it's name.
- Keep expanding
src.main.java.com.example.examplemoduntil you reachExampleMod. - Double click on
ExampleModto open up it's source code.
You can now run the code to make sure everything is set up properly. To do so, click on the small play icon in the top bar of the screen. You should get another Minecraft window popping up, and just like in the last section, you should be able to see the Example Mod in the Mods list in the main menu.
-
 Step 4
 -
 Step 6
 -
 Steps 7, 8 and 9


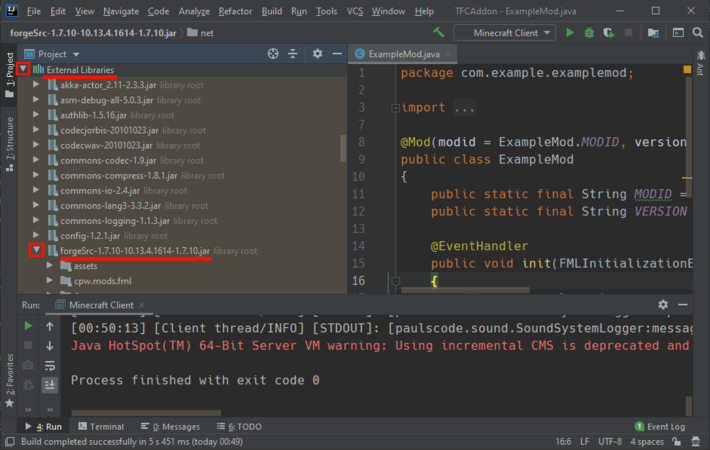
Inspecting Minecraft and TFC+ Source Code
Since you are making a mod for Minecraft and TFC+ it is important to eventually get yourself familiarized with their source code. Inspecting how Minecraft's source does something can give you a great idea about how to do similar things. We will now see where we can find these sources.
To find Minecraft's source code in your Intellij project:
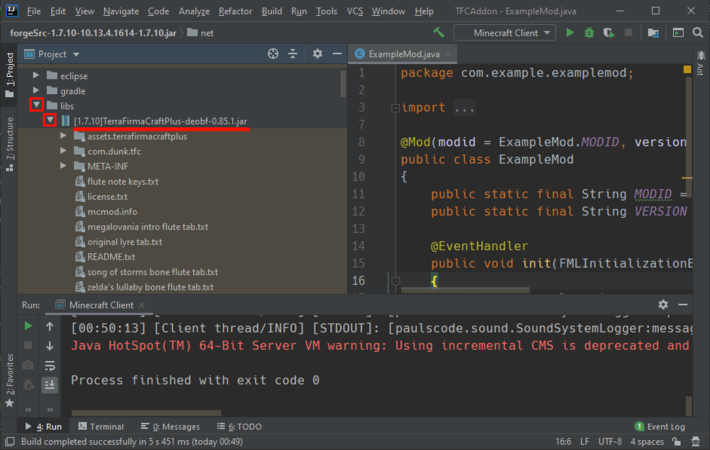
- Scroll down on the project pane to "External Libraries".
- Click the little arrow next to it to expand it.
- Then scroll down until you find a library root called
forgeSrc-1.7.10-XX.XX.XX.XXXX-1.7.10.jar. - This contains the deobfuscated Minecraft source code, expand it.
- Let's now see how the dirt blocks in vanilla Minecraft are coded. Keep expanding until you get to
net.minecraft.block, this is the directory where all vanilla blocks are coded. - Double click on
BlockDirtto see what the code structure of a simple block looks like.
To find the source code of TFC+:
- Scroll up on the project pane and expand
libsdirectory you made. - Inside of it should be the deobfuscated TFC+ source code you copied there earlier - expand it.
- Let's now see where all of the TFC+ items are instantiated. Keep expanding until you get to
com.dunk.tfc. - Double click on
ItemSetup, this is a long file in which all TFC+ items are instantiated. - Let's see how a simple coal item is coded in TFC+, scroll down to line 188 where it is instantiated.
- While holding Control/Command, click on
ItemCoalthis will take you to theItemCoalfile where you can see how a simple TFC+ item is coded. - You can Control/Command click on any other item if you want to see how it was coded as well.
Note: If you cannot expand the deobfuscated TFC+ source code jar file from your project pane, then you first need to add it as a library to your project. Right click on the jar, and select the "Add as library" option. You should now be able to expand it.
-
 Minecraft's source code location
 -
 TFC+ source code location


Making a Basic Addon
TODO
Tips and Tricks
- Whenever you're stuck on how to do something, check how Minecraft or TFC+ does it in their respective sources. Chances are there is already a block/item/entity that is similar to what you want to create, and this is great starting point.
- If the above point fails, look around Github for how other minecraft mods solved your problem. In particular, you can find source code for TFC+ addons Here, or from the Addons page.
- Be wary of what you read online. Many tutorials and web-pages are either for older, or newer versions of Minecraft, where things have changed substantially.
- You can find a list of Forge events in the
forgeSrclibrary undercpw.mods.fml.client.event,cpw.mods.fml.common.event, andnet.minecraftforge.event. - Be mindful of which events are posted on which event bus when you register your event handlers. Some events should be registered with
MinecraftForge.EVENT_BUS.register(), while others should be registered withFMLCommonHandler.instance().bus().register(). - If you are unsure what bus a particular event is posted to, find where they are instantiated in the Minecraft source code to see where Forge posts it.
- Be aware that you will need to find some way to synchronize the client and the server in many cases. If you try to teleport a player simply changing their coordinates on the client side, the server will "correct" your "mistake" unless it is aware of this change.
- Be very careful when making mods that are supposed to run on a dedicated server. The Minecraft jar running on the server is different than the jar running on the client; it's missing many of the classes that the client jar has. This means that if you try to import a class from the
net.minecraft.clientpackage, you will crash the server as those classes don't exist in the server's jar file. Use Forge's@SidedProxyannotation to write correct sided code. - If there is a vanilla or TFC+ field or method that you need to access but that is private or protected, you can always use Reflection to access it anyway. Although you should only do this as a last resort since it is messy and comes with a performance penalty. Look up Access Transformers for a cleaner solution.