Difference between revisions of "Metalworking Guide"
Kittychanley (Talk | contribs) m (Ingot 2x --> Double Ingot) |
|||
| (17 intermediate revisions by 4 users not shown) | |||
| Line 1: | Line 1: | ||
| − | = Casting Age (Copper & Bronzes) = | + | =Casting Age (Copper & Bronzes)(鋳造時代 (銅・青銅) )= |
| − | == Gathering Ore == | + | ==Gathering Ore(鉱石を集める)== |
There are currently two stone-age methods of gathering [[ore]], running around and looking for them as items on the surface, or by using a [[Gold Pan]]. | There are currently two stone-age methods of gathering [[ore]], running around and looking for them as items on the surface, or by using a [[Gold Pan]]. | ||
| + | (石器時代に [[ore|鉱石]]を集めるの方法は現在2つあり、走り回って地表の小さな鉱石を探す方法と、 [[Gold Pan|選鉱皿]]を使う方法がある。) | ||
To make a single metal tool head you will need to collect 10 pieces of small, copper-bearing ore: | To make a single metal tool head you will need to collect 10 pieces of small, copper-bearing ore: | ||
| + | (金属製の道具のツールヘッドを1つ作るには、銅を含む小さな鉱石を10個集める必要がある:) | ||
{{InfoTable/CopperOre}} | {{InfoTable/CopperOre}} | ||
| − | If you wish to make {{font color|red|'''''bronze'''''}}¹ tools, you can follow the [[ | + | If you wish to make {{font color|red|'''''bronze'''''}}¹ tools, you can follow the [[alloys|alloy]] recipe and replace some of the copper ores with the following: |
| + | ({{font color|red|'''''ブロンズ'''''}}¹製の道具を作りたい場合は、[[Alloys|合金]]のレシピに従い、銅鉱石の一部を以下のものに置き換えることができる:) | ||
{| class="wikitable" | {| class="wikitable" | ||
| − | |{{GridImage|Bismuthinite (Small)}} [[Bismuthinite]] | + | |{{GridImage|Bismuthinite (Small)}} [[Bismuthinite|Bismuthinite(輝蒼鉛鉱)]] |
| − | |{{GridImage|Cassiterite (Small)}} [[Cassiterite]] | + | |{{GridImage|Cassiterite (Small)}} [[Cassiterite|[Cassiterite(錫石)]] |
| − | |{{GridImage|Sphalerite (Small)}} [[Sphalerite]] | + | |{{GridImage|Sphalerite (Small)}} [[Sphalerite|Sphalerite(閃亜鉛鉱)]] |
| − | |{{GridImage|Native Gold (Small)}} [[Native Gold]] | + | |{{GridImage|Native Gold (Small)}} [[Native Gold|Native Gold(自然金)]] |
| − | |{{GridImage|Native Silver (Small)}} [[Native Silver]] | + | |{{GridImage|Native Silver (Small)}} [[Native Silver|Native Silver(自然銀)]] |
|} | |} | ||
| − | ¹ | + | ¹ Note: Only metals that have the word bronze in their name are considered bronze. Other metals made out of the above ores that do not have bronze in their name, such as [[Brass]], [[Rose Gold]], and [[Sterling Silver]] are not bronzes or copper, and therefore cannot be made into tools. |
| + | (¹注:青銅と名のつく金属のみが青銅とみなされる。上記の鉱石から作られる他の金属、例えば[[Brass|真鍮]]、[[Rose Gold|ローズゴールド]]、[[Sterling Silver|スターリングシルバー]]は青銅でも銅でもないため、道具にすることはできない。) | ||
| − | == | + | === 試掘と採掘 === |
| + | |||
| + | 地表に小さな鉱石があるところの地下には鉱脈があるということである。 [[Prospector's Pick|探鉱鎚]]はプレイヤーが鉱石からどのくらい離れているかをより正確に知ることができる。ゲームが始めったばかりの時、プレイヤーがツルハシしか持っていない場合、鉱石を探すのは難しいかもしれない。探鉱槌を持っていないプレイヤーが鉱石を探す1つの方法は、小さな鉱石が出現するエリアの中央付近で適当にに穴を掘ることです。 | ||
| + | |||
| + | == 製錬 == | ||
| − | + | 注: [[Vessel|小さな壺]]では鉱石からしか製錬できない。インゴットの場合、炉で加熱して液化させるか、合金を作るなら[[Crucible|るつぼ]]を使う必要がある。 | |
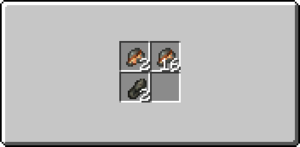
[[File:VesselOresForBronze.png|link=|thumb|Filling a Vessels with Ores for Bronze]] | [[File:VesselOresForBronze.png|link=|thumb|Filling a Vessels with Ores for Bronze]] | ||
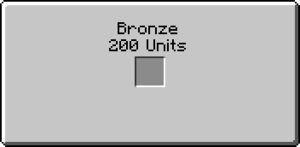
[[File:VesselMoltenBronze.png|link=|thumb|A Vessel Containing Molten Bronze]] | [[File:VesselMoltenBronze.png|link=|thumb|A Vessel Containing Molten Bronze]] | ||
| − | === | + | === 銅 === |
| − | + | [[Pottery#Ceramic Vessel|陶製の容器]]は、[[Native Copper|自然銅]]、[[Malachite|孔雀石]]、[[Tetrahedrite|安四面銅鉱]]を純粋な溶けた銅に精錬するために使用できる。これを行うには、容器に鉱石を詰め(異なる鉱石のスタックを同じ容器に一緒に入れてもよい)、[[Pottery#Pit_Kiln|窯]]で焼く。 | |
After the firing, retrieve the vessel from the kiln and right-click it to open up its GUI. You will see that now instead of the usual four slots the vessel has only one and contains text describing the amount of metal it contains. This metal will remain liquid for about 10 Minecraft hours, starting after the firing completes. If the metal inside solidifies, the GUI will not open and you must fire it in a pit kiln again to re-melt it. ''Note: Vessels with molten metal inside will have a white, "Liquid" tooltip on them.'' | After the firing, retrieve the vessel from the kiln and right-click it to open up its GUI. You will see that now instead of the usual four slots the vessel has only one and contains text describing the amount of metal it contains. This metal will remain liquid for about 10 Minecraft hours, starting after the firing completes. If the metal inside solidifies, the GUI will not open and you must fire it in a pit kiln again to re-melt it. ''Note: Vessels with molten metal inside will have a white, "Liquid" tooltip on them.'' | ||
| Line 77: | Line 85: | ||
== [[Anvils]] == | == [[Anvils]] == | ||
| − | In order to progress out of the Casting Age, you will first need to work your way up to a Tier 2 Anvil. | + | In order to progress out of the Casting Age, you will first need to work your way up to a Tier 2 Anvil. Anvils are the main machine used in metalworking; using them, you can craft advanced metal items, as well as produce tools and armor of higher quality than possible from casting. The full explanation of the Anvil GUI can be found at the [[Anvil]] page. |
=== Stone === | === Stone === | ||
| Line 110: | Line 118: | ||
=== Bronze === | === Bronze === | ||
| − | After you have obtained seven Bronze | + | After you have obtained seven Bronze, Bismuth Bronze, or Black Bronze Double Ingots, craft them into an Anvil where you can work Bronze Double Ingots into [[Metal_Sheet|Sheets]] and weld Sheets into [[Metal_Double_Sheet|Double Sheets]]. |
{{Grid/Crafting Table | {{Grid/Crafting Table | ||
| − | |A1= Bronze Double Ingot |B1= Bronze Double Ingot |C1= Bronze Double Ingot | + | |A1= Bronze Double Ingot; Bismuth Bronze Double Ingot; Black Bronze Double Ingot |B1= Bronze Double Ingot; Bismuth Bronze Double Ingot; Black Bronze Double Ingot |C1= Bronze Double Ingot; Bismuth Bronze Double Ingot; Black Bronze Double Ingot |
| − | |A2= |B2= Bronze Double Ingot |C2= | + | |A2= |B2= Bronze Double Ingot; Bismuth Bronze Double Ingot; Black Bronze Double Ingot |C2= |
| − | |A3= Bronze Double Ingot |B3= Bronze Double Ingot |C3= Bronze Double Ingot | + | |A3= Bronze Double Ingot; Bismuth Bronze Double Ingot; Black Bronze Double Ingot |B3= Bronze Double Ingot; Bismuth Bronze Double Ingot; Black Bronze Double Ingot |C3= Bronze Double Ingot; Bismuth Bronze Double Ingot; Black Bronze Double Ingot |
| − | |Output= Anvil (Bronze) | + | |Output= Anvil (Bronze); Anvil (Bismuth Bronze); Anvil (Black Bronze) |
}} | }} | ||
| − | |||
= Iron Age = | = Iron Age = | ||
| Line 183: | Line 190: | ||
|- | |- | ||
|[[File:Grid Copper Ingot.png|link=]] '''Ingot''' | |[[File:Grid Copper Ingot.png|link=]] '''Ingot''' | ||
| − | |align="Center"| | + | |align="Center"|[[Anvil#Anvil_GUI|Plan selector]] |
| | | | ||
{| | {| | ||
| − | | | + | |{{GridImage|Axe Head (Copper)}} [[Axe|'''Axe Head''']] {{GridImage|Chisel Head (Copper)}} [[Chisel|'''Chisel Head''']] {{GridImage|Hammer Head (Copper)}} [[Hammer|'''Hammer Head''']] {{GridImage|Hoe Head (Copper)}} [[Hoe|'''Hoe Head''']] {{GridImage|Javelin Head (Copper)}} [[Javelin|'''Javelin Head''']] {{GridImage|Knife Blade (Copper)}} [[Knife|'''Knife Blade''']] |
| − | | | + | |
| − | | | + | |
| − | | | + | |
| − | | | + | |
| − | | | + | |
|- | |- | ||
| − | | | + | |{{GridImage|Pick Head (Copper)}} [[Pickaxe|'''Pickaxe Head''']] {{GridImage|ProPick Head (Copper)}} [[Prospector%27s_Pick|'''Prospector's Pick Head''']] {{GridImage|Saw Blade (Copper)}} [[Saw|'''Saw Blade''']] {{GridImage|Shovel Head (Copper)}} [[Shovel|'''Shovel Head''']] {{GridImage|Scythe Blade (Copper)}} [[Scythe|'''Scythe Blade''']] |
| − | | | + | |
| − | | | + | {{GridImage|Mason's Trowel Head (Copper)}} [[Trowel|'''Trowel Head''']] |
| − | | | + | |- |
| − | |[[ | + | |{{GridImage|Iron Needle}}'''[[Needle|Iron Needle]]''' |
| | | | ||
|- | |- | ||
| Line 204: | Line 206: | ||
|[[File:Grid Gold Ingot.png]] '''2 Ingots + Flux''' | |[[File:Grid Gold Ingot.png]] '''2 Ingots + Flux''' | ||
|align="Center"|Weld | |align="Center"|Weld | ||
| − | |[[File:Grid Gold Double Ingot.png]] '''Double Ingot''' | + | |[[File:Grid Gold Double Ingot.png]] '''[[Double Ingot]]''' |
|- | |- | ||
|[[File:Grid Bismuth Bronze Double Ingot.png]] '''Double Ingot''' | |[[File:Grid Bismuth Bronze Double Ingot.png]] '''Double Ingot''' | ||
| − | |align="Center"| | + | |align="Center"|[[Anvil#Anvil_GUI|Plan selector]] |
| | | | ||
{| | {| | ||
|[[File:Grid Mace Head (Bismuth Bronze).png]]'''Mace Head''' | |[[File:Grid Mace Head (Bismuth Bronze).png]]'''Mace Head''' | ||
|[[File:Grid Sword Blade (Bismuth Bronze).png]] '''Sword Blade''' | |[[File:Grid Sword Blade (Bismuth Bronze).png]] '''Sword Blade''' | ||
| + | |[[File:Grid Bismuth Bronze Sheet.png]] '''Sheet''' | ||
|- | |- | ||
|} | |} | ||
|- | |- | ||
| − | |[[File:Grid | + | |[[File:Grid Brass Sheet.png]] '''Sheet''' |
| − | |align="Center"| | + | |align="Center"|[[Anvil#Anvil_GUI|Plan selector]] |
| − | |[[ | + | | |
| + | {| | ||
| + | |{{GridImage|Brass Tube}} [[Musical Instruments#Bugle|'''Brass Tube''']] | ||
| + | |{{GridImage|Metal Trapdoor}} [[Crafting Index#Metal Trap Door|'''Trap Door''']] | ||
| + | |{{GridImage|Red Steel Bucket}} [[Bucket#Metal Bucket|'''Red Steel Bucket''']] | ||
| + | |{{GridImage|Blue Steel Bucket}} [[Bucket#Metal Bucket|'''Blue Steel Bucket''']] | ||
| + | |} | ||
|- | |- | ||
|[[File:Grid Black Bronze Sheet.png]] '''Sheet''' | |[[File:Grid Black Bronze Sheet.png]] '''Sheet''' | ||
| Line 225: | Line 234: | ||
|[[File:Grid Black Bronze Helmet.png|link=Armor]] '''[[Armor|Helmet]]''' | |[[File:Grid Black Bronze Helmet.png|link=Armor]] '''[[Armor|Helmet]]''' | ||
|[[File:Grid Black Bronze Boots.png|link=Armor]] '''[[Armor|Boots]]''' | |[[File:Grid Black Bronze Boots.png|link=Armor]] '''[[Armor|Boots]]''' | ||
| − | |||
| − | |||
| − | |||
| − | |||
| − | |||
| − | |||
| − | |||
| − | |||
| − | |||
|- | |- | ||
|} | |} | ||
| Line 239: | Line 239: | ||
|[[File:Grid Silver Sheet.png]] '''2 Sheets + Flux''' | |[[File:Grid Silver Sheet.png]] '''2 Sheets + Flux''' | ||
|align="Center"|Weld | |align="Center"|Weld | ||
| − | |[[File:Grid Silver Sheet | + | |[[File:Grid Silver Double Sheet.png]] '''[[Double Sheet]]''' |
|- | |- | ||
| − | |[[File:Grid Black Bronze Sheet | + | |[[File:Grid Black Bronze Double Sheet.png]] '''Double Sheet''' |
|align="Center"|Armor Process¹ | |align="Center"|Armor Process¹ | ||
| | | | ||
| Line 250: | Line 250: | ||
|} | |} | ||
|- | |- | ||
| − | |[[File:Grid Steel Sheet | + | |[[File:Grid Steel Double Sheet.png]] '''Double sheet''' |
| − | |align="Center"| | + | |align="Center"|[[Anvil#Anvil_GUI|Plan selector]] |
| + | | | ||
| + | {| | ||
|[[File:Grid Steel Tuyere.png]] '''Tuyere''' | |[[File:Grid Steel Tuyere.png]] '''Tuyere''' | ||
| + | |} | ||
|- | |- | ||
| + | |{{GridImage|Brass Tube}} '''Brass Tube''' | ||
| + | |align="Center"|[[Anvil#Anvil_GUI|Plan selector]] | ||
| + | | | ||
| + | {| | ||
| + | |{{GridImage|Bugle}} [[Musical Instruments#Bugle|'''Bugle''']] | ||
| + | |} | ||
| + | |- | ||
| + | |[[File:Grid Knife Blade (Wrought Iron).png]] '''2 Wrought Iron Knife Blades''' | ||
| + | |align="Center"|[[Anvil#Anvil_GUI|Plan selector]] | ||
| + | | | ||
| + | {| | ||
| + | |[[File:Grid Shears.png]] [[Crafting Index#Shears|'''Shears''']] | ||
| + | |} | ||
| + | |- | ||
| + | |} | ||
| + | {| | ||
| + | |¹ ||{{Further|Armor}} | ||
|} | |} | ||
| − | |||
| − | |||
| + | = Post-Steel Age = | ||
| + | |||
| + | The end-game Tier 6 and Tier 7 alloys mostly revolve around mixing components in a [[Crucible]]. Most notably, a Red Steel Bucket enables the player to move water sources, while a Blue Steel Bucket enables the player to move Lava sources. Blue Steel Lanterns will also function as permanent light sources if filled with lava. | ||
| + | |||
| + | == Mixing Black Steel == | ||
| + | |||
| + | [[Black Steel]] can be mixed in a [[Crucible]]. Black Steel is an Tier-6 metal that can be used for tools and armor, and is also required in the alloying of Tier 7 steels. | ||
| + | |||
| + | {| class="wikitable" style="text-align: center;" | ||
| + | |- | ||
| + | ! Metal | ||
| + | |{{GridBlank|Unshaped Steel}}[[Steel]] | ||
| + | |{{GridBlank|Unshaped Nickel}}[[Nickel]] | ||
| + | |{{GridBlank|Unshaped Black Bronze}}[[Black Bronze]] | ||
| + | |- | ||
| + | ! Percentage | ||
| + | |50-70% | ||
| + | |15-25% | ||
| + | |15-25% | ||
| + | |} | ||
| + | *Produces Weak Steel. Work into an Ingot and Weld with Pig Iron to create High Carbon Black Steel | ||
| + | **Work again on the anvil to beat out the impurities and create Black Steel | ||
| + | |||
| + | == Mixing Red Steel == | ||
| + | |||
| + | {| class="wikitable" style="text-align: center;" | ||
| + | |- | ||
| + | ! Metal | ||
| + | |{{GridBlank|Unshaped Black Steel}}[[Black Steel]] | ||
| + | |{{GridBlank|Unshaped Rose Gold}}[[Rose Gold]] | ||
| + | |{{GridBlank|Unshaped Brass}}[[Brass]] | ||
| + | |{{GridBlank|Unshaped Steel}}[[Steel]] | ||
| + | |- | ||
| + | ! Percentage | ||
| + | |50-55% | ||
| + | |10-15% | ||
| + | |10-15% | ||
| + | |20-25% | ||
| + | |} | ||
| + | *Produces Weak Red Steel. Work into an Ingot and Weld with Black Steel to create High Carbon Red Steel | ||
| + | **Work again on the anvil to beat out the impurities and create Red Steel | ||
| + | |||
| + | == Mixing Blue Steel == | ||
| + | |||
| + | {| class="wikitable" style="text-align: center;" | ||
| + | |- | ||
| + | ! Metal | ||
| + | |{{GridBlank|Unshaped Bismuth Bronze}}[[Bismuth Bronze]] | ||
| + | |{{GridBlank|Unshaped Black Steel}}[[Black Steel]] | ||
| + | |{{GridBlank|Unshaped Sterling Silver}}[[Sterling Silver]] | ||
| + | |{{GridBlank|Unshaped Steel}}[[Steel]] | ||
| + | |- | ||
| + | ! Percentage | ||
| + | |10-15% | ||
| + | |50-55% | ||
| + | |10-15% | ||
| + | |20-25% | ||
| + | |} | ||
| + | *Produces Weak Blue Steel. Work into an Ingot and Weld with Black Steel to create High Carbon Blue Steel | ||
| + | **Work again on the anvil to beat out the impurities and create Blue Steel | ||
| + | {{NavboxMetalworking}} | ||
{{Blocks}} | {{Blocks}} | ||
Latest revision as of 13:31, 6 December 2023
Casting Age (Copper & Bronzes)(鋳造時代 (銅・青銅) )
Gathering Ore(鉱石を集める)
There are currently two stone-age methods of gathering ore, running around and looking for them as items on the surface, or by using a Gold Pan. (石器時代に 鉱石を集めるの方法は現在2つあり、走り回って地表の小さな鉱石を探す方法と、 選鉱皿を使う方法がある。)
To make a single metal tool head you will need to collect 10 pieces of small, copper-bearing ore: (金属製の道具のツールヘッドを1つ作るには、銅を含む小さな鉱石を10個集める必要がある:)
| Copper Ore | ||||
|---|---|---|---|---|
If you wish to make bronze¹ tools, you can follow the alloy recipe and replace some of the copper ores with the following: (ブロンズ¹製の道具を作りたい場合は、合金のレシピに従い、銅鉱石の一部を以下のものに置き換えることができる:)
¹ Note: Only metals that have the word bronze in their name are considered bronze. Other metals made out of the above ores that do not have bronze in their name, such as Brass, Rose Gold, and Sterling Silver are not bronzes or copper, and therefore cannot be made into tools. (¹注:青銅と名のつく金属のみが青銅とみなされる。上記の鉱石から作られる他の金属、例えば真鍮、ローズゴールド、スターリングシルバーは青銅でも銅でもないため、道具にすることはできない。)
試掘と採掘
地表に小さな鉱石があるところの地下には鉱脈があるということである。 探鉱鎚はプレイヤーが鉱石からどのくらい離れているかをより正確に知ることができる。ゲームが始めったばかりの時、プレイヤーがツルハシしか持っていない場合、鉱石を探すのは難しいかもしれない。探鉱槌を持っていないプレイヤーが鉱石を探す1つの方法は、小さな鉱石が出現するエリアの中央付近で適当にに穴を掘ることです。
製錬
注: 小さな壺では鉱石からしか製錬できない。インゴットの場合、炉で加熱して液化させるか、合金を作るならるつぼを使う必要がある。
銅
陶製の容器は、自然銅、孔雀石、安四面銅鉱を純粋な溶けた銅に精錬するために使用できる。これを行うには、容器に鉱石を詰め(異なる鉱石のスタックを同じ容器に一緒に入れてもよい)、窯で焼く。
After the firing, retrieve the vessel from the kiln and right-click it to open up its GUI. You will see that now instead of the usual four slots the vessel has only one and contains text describing the amount of metal it contains. This metal will remain liquid for about 10 Minecraft hours, starting after the firing completes. If the metal inside solidifies, the GUI will not open and you must fire it in a pit kiln again to re-melt it. Note: Vessels with molten metal inside will have a white, "Liquid" tooltip on them.
Bronzes
A Ceramic Vessel can also be used to create Bronze, Black Bronze and Bismuth Bronze.
Before Firing: Place the necessary ores into a Ceramic Vessel, in the proper proportions for the desired type of bronze. For example, if you wanted to create normal Bronze then you would put copper ore (any combination of Native Copper, Malachite or Tetrahedrite) and Cassiterite into the vessel. For each alloy there is a range of proportions which will produce the desired alloy so you don't have to hit an exact percentage, just be within the range.
After Firing: If you got the proportions right then when you right-click the vessel it will open up the same single-slot GUI as described above for smelting pure ores. You can then transfer the molten bronze metal to a Ceramic Mold in the same way. If you got the proportions wrong then when you right-click the vessel you'll get the four-slot storage GUI showing the raw ores still sitting in the vessel, unchanged.
Casting
Ceramic tool and weapon molds can be filled directly from the vessel, or from a liquid unshaped ingot.
All the recipes for tool and weapon molds can be found at the Clay Tool Molds page. ![]()
Vessel
Place an empty or partially filled Ceramic Tool, Weapon, or Ingot Mold into the slot to fill it with metal from the vessel. It takes 100 units of metal to completely fill an empty Ceramic Mold. The text in the vessel's GUI will be updated to show the amount of metal remaining in the vessel.
Unshaped Ingot
If the copper or bronze has already been turned into an ingot, simply heat it in a forge with an empty ingot mold in the appropriate slot to melt it. While the full, unshaped metal is at liquid temperature, right click with it in your hand to open the casting GUI. You will see an arrow with one slot to its left and two to its right. The leftmost slot will contain the filled mold. Place a single empty tool or weapon mold into the first slot on the right to begin the transfer. Once the transfer is complete the tool mold will move into the output slot and will show itself filled with metal.
Retrieve the filled tool mold and the now-empty Ceramic Mold from the slots on the left. There is a chance that the Ceramic Ingot Mold will be broken and lost during this process.
Once the mold is full, place it into your crafting area and retrieve the finished tool or weapon head from the output. The mold will be destroyed in the process.
|
|
Anvils
In order to progress out of the Casting Age, you will first need to work your way up to a Tier 2 Anvil. Anvils are the main machine used in metalworking; using them, you can craft advanced metal items, as well as produce tools and armor of higher quality than possible from casting. The full explanation of the Anvil GUI can be found at the Anvil page.
Stone
By using a hammer on the top of a raw Igneous stone block that is in its natural spawning layer, you will open the anvil GUI, where you can weld Copper Ingots into Double Ingots.
| Igneous Stone | ||||
|---|---|---|---|---|
| Igneous Intrusive | |
|
|
|
| Igneous Extrusive | |
|
|
|
Copper
After you have obtained seven Copper Double Ingots, craft them into a Copper Anvil, where you can weld Bronze Ingots into Double Ingots.
| |
|
|
|
|
| |
||||
| |
|
|
Bronze
After you have obtained seven Bronze, Bismuth Bronze, or Black Bronze Double Ingots, craft them into an Anvil where you can work Bronze Double Ingots into Sheets and weld Sheets into Double Sheets.
| |
|
|
|
|
| |
||||
| |
|
|
Iron Age
Gathering Ore
By now you should have a Pickaxe and a Prospector's Pick to use for finding and mining ore.
Smelting
Wrought Iron
Wrought Iron is obtained by working an Iron Bloom that has been created in a Bloomery.
| Input | Work Type | Output | Notes |
|---|---|---|---|
| |
Refine | |
Work on at least a Tier 2 anvil.
|
| |
Split | |
Only needed for blooms over 100%. If starting bloom isn't a multiple of 100%, it will split into as many 100% blooms as possible as well as a single bloom with the remaining %. For example: A 360% bloom will split into 3 100% blooms and a single 60% bloom. |
| |
Hammer | |
|
| |
Weld | |
Weld 2 < 100% refined blooms to make one larger bloom. If the resulting bloom is over 100% it must be split into a 100% bloom and a <100% one. The smaller bloom can be welded with another one following the same process. |
Note: Forges and Crucibles cannot get hot enough to melt refined iron blooms without the use of mechanized bellows.
Pig Iron
Pig Iron is obtained by smelting the Iron Ore in a Blast Furnace.
Steel
| Input | Work Type | Output |
|---|---|---|
| Hammer | ||
| Hammer | ||
| Black Steel starts from the alloy recipe melted in a crucible. It will show as Weak Steel in the crucible. | ||
| Weld | ||
| Hammer | ||
| Blue/Red Steel start from the alloy recipe melted in a crucible. It will show as Weak Blue/Red Steel in the crucible. | ||
| Weld | ||
| Hammer | ||
Smithing
See Anvil page for the guidelines of smithing metal.
| Input | Work Type | Output | ||||
|---|---|---|---|---|---|---|
| Plan selector |
| |||||
| Weld | ||||||
| Plan selector |
| |||||
| Plan selector |
| |||||
| Armor Process¹ |
| |||||
| Weld | ||||||
| Armor Process¹ |
| |||||
| Plan selector |
| |||||
| Plan selector |
| |||||
| Plan selector |
|
| ¹ | Further information: Armor
|
Post-Steel Age
The end-game Tier 6 and Tier 7 alloys mostly revolve around mixing components in a Crucible. Most notably, a Red Steel Bucket enables the player to move water sources, while a Blue Steel Bucket enables the player to move Lava sources. Blue Steel Lanterns will also function as permanent light sources if filled with lava.
Mixing Black Steel
Black Steel can be mixed in a Crucible. Black Steel is an Tier-6 metal that can be used for tools and armor, and is also required in the alloying of Tier 7 steels.
| Metal | |||
|---|---|---|---|
| Percentage | 50-70% | 15-25% | 15-25% |
- Produces Weak Steel. Work into an Ingot and Weld with Pig Iron to create High Carbon Black Steel
- Work again on the anvil to beat out the impurities and create Black Steel
Mixing Red Steel
| Metal | ||||
|---|---|---|---|---|
| Percentage | 50-55% | 10-15% | 10-15% | 20-25% |
- Produces Weak Red Steel. Work into an Ingot and Weld with Black Steel to create High Carbon Red Steel
- Work again on the anvil to beat out the impurities and create Red Steel
Mixing Blue Steel
| Metal | ||||
|---|---|---|---|---|
| Percentage | 10-15% | 50-55% | 10-15% | 20-25% |
- Produces Weak Blue Steel. Work into an Ingot and Weld with Black Steel to create High Carbon Blue Steel
- Work again on the anvil to beat out the impurities and create Blue Steel
| Items | Metals • Ores & Minerals • Ingot • Gold Pan • Tool Molds • Ceramic Molds • Sheet Mold • Armor • Alloys • Charcoal • Coal • Flux • Metal Sheet • Double Ingots • Double Sheets • Unshaped Metal • Blowpipe | ||||||||||||||
|---|---|---|---|---|---|---|---|---|---|---|---|---|---|---|---|
| Machines |
|
||||||||||||||
| Metals |
|
||||||||||||||