Difference between revisions of "Stone-Age Guide"
m (→Sticks and Stones: typo) |
m (→Knapping: fixed knapping templates) |
||
| Line 73: | Line 73: | ||
Stone tool heads are crafted by hitting stones together to break them into useful shapes. This is called knapping. Stones are knapped into tool heads which can be attached to a stick to make a tool. | Stone tool heads are crafted by hitting stones together to break them into useful shapes. This is called knapping. Stones are knapped into tool heads which can be attached to a stick to make a tool. | ||
To knap stone, hold two or more rocks in your hand and right-click on the ground. | To knap stone, hold two or more rocks in your hand and right-click on the ground. | ||
| − | {{ | + | {{Knapping |
|A1= terraRock 01 |B1= terraRock 01 |C1= terraRock 01 |D1= terraRock 01 |E1= terraRock 01 | |A1= terraRock 01 |B1= terraRock 01 |C1= terraRock 01 |D1= terraRock 01 |E1= terraRock 01 | ||
|A2= terraRock 01 |B2= terraRock 01 |C2= terraRock 01 |D2= terraRock 01 |E2= terraRock 01 | |A2= terraRock 01 |B2= terraRock 01 |C2= terraRock 01 |D2= terraRock 01 |E2= terraRock 01 | ||
| Line 83: | Line 83: | ||
The knapping interface is a 5x5 grid. Clicking on a square of the grid will break off that piece of stone. Be careful where you click. If you make a mistake, you can't undo it and you may have to start again. Once you knap the stone into the right shape, a tool head will appear on the right. Take the tool head and craft it with a stick (or a bone) in the crafting grid to create a stone tool. | The knapping interface is a 5x5 grid. Clicking on a square of the grid will break off that piece of stone. Be careful where you click. If you make a mistake, you can't undo it and you may have to start again. Once you knap the stone into the right shape, a tool head will appear on the right. Take the tool head and craft it with a stick (or a bone) in the crafting grid to create a stone tool. | ||
{{Grid/Inventory Table | {{Grid/Inventory Table | ||
| − | |A1= |B1= Stone Axe Head | + | |A1= |B1= Stone Axe Head;Stone Axe Head;Stone Knife Head;Stone Knife Head;Stone Shovel Head;Stone Shovel Head |
|A2= |B2= Stick; Bone | |A2= |B2= Stick; Bone | ||
| − | |Output= Stone Axe | + | |Output= Stone Axe; Stone Axe; Stone Knife; Stone Knife; Stone Shovel; Stone Shovel |
}} | }} | ||
Finished tools do not stack, but tool heads do. At night when you are hiding from monsters, you can knap extra tool heads to keep in your inventory. Then during the day, you can quickly craft new tools as you need them. Tools cannot be repaired in TFC+, so it’s okay to use a tool until it breaks. The tools you will want to make right away are a knife, an axe, and a maybe a shovel. With these tools you can get food, simple clothing, and shelter. | Finished tools do not stack, but tool heads do. At night when you are hiding from monsters, you can knap extra tool heads to keep in your inventory. Then during the day, you can quickly craft new tools as you need them. Tools cannot be repaired in TFC+, so it’s okay to use a tool until it breaks. The tools you will want to make right away are a knife, an axe, and a maybe a shovel. With these tools you can get food, simple clothing, and shelter. | ||
| − | |||
==== Knife ==== | ==== Knife ==== | ||
Knives are weak melee weapon, but better than bare hands. They are mainly used as a tool. With a knife, you can remove decay from food, process cereal crops, cut food into smaller pieces, collect straw, and turn furs and animal hides into leather or clothing. | Knives are weak melee weapon, but better than bare hands. They are mainly used as a tool. With a knife, you can remove decay from food, process cereal crops, cut food into smaller pieces, collect straw, and turn furs and animal hides into leather or clothing. | ||
| − | { | + | {{Knapping |
| − | + | |A1= terraRock 01|B1= |D1= |E1= | |
| − | |A1= terraRock 01 | + | |A2= terraRock 01 |B2= terraRock 01 |D2= |E2= |
| − | |A2= terraRock 01 |B2= terraRock 01 |D2= | + | |A3= terraRock 01 |B3= terraRock 01 |D3= |E3= |
| − | |A3= terraRock 01 |B3= terraRock 01 |D3= | + | |A4= terraRock 01 |B4= terraRock 01 |D4= |E4= |
| − | |A4= terraRock 01 |B4= terraRock 01 |D4= | + | |A5= terraRock 01 |B5= terraRock 01 |D5= |E5= |
| − | |A5= terraRock 01 |B5= terraRock 01 |D5= | + | |Output= Stone Knife Blade |
| − | |Output= Stone Knife Blade | + | |
}} | }} | ||
| − | |||
| − | |||
| − | |||
| − | |||
| − | |||
| − | |||
| − | |||
==== Axe ==== | ==== Axe ==== | ||
You can’t punch down trees in TFC+. You need an axe to fell a tree. Axes can also be used as a melee weapon. | You can’t punch down trees in TFC+. You need an axe to fell a tree. Axes can also be used as a melee weapon. | ||
| − | + | {{Knapping | |
| − | + | |A1= |B1= terraRock 01 |C1= |D1= |E1= | |
| − | |A1= |B1= terraRock 01 | + | |A2= terraRock 01 |B2= terraRock 01 |C2= terraRock 01 |D2= terraRock 01 |E2= |
| − | |A2= terraRock 01 | + | |
|A3= terraRock 01 |B3= terraRock 01 |C3= terraRock 01 |D3= terraRock 01 |E3= terraRock 01 | |A3= terraRock 01 |B3= terraRock 01 |C3= terraRock 01 |D3= terraRock 01 |E3= terraRock 01 | ||
| − | |A4= terraRock 01 | + | |A4= terraRock 01 |B4= terraRock 01 |C4= terraRock 01 |D4= terraRock 01 |E4= |
| − | |A5= |B5= terraRock 01 | + | |A5= |B5= terraRock 01 |C5= |D5= |E5= |
|Output= Stone Axe Head | |Output= Stone Axe Head | ||
}} | }} | ||
| − | |||
| − | |||
| − | |||
| − | |||
| − | |||
| − | |||
| − | |||
==== Shovel ==== | ==== Shovel ==== | ||
Digging by hand is very slow. Use a shovel gather dirt, clay, gravel, and sand faster. It can also be used as a melee weapon. | Digging by hand is very slow. Use a shovel gather dirt, clay, gravel, and sand faster. It can also be used as a melee weapon. | ||
| − | { | + | {{Knapping |
| − | + | ||
|A1= |B1= terraRock 01 |C1= terraRock 01 |D1= terraRock 01 |E1= | |A1= |B1= terraRock 01 |C1= terraRock 01 |D1= terraRock 01 |E1= | ||
|A2= |B2= terraRock 01 |C2= terraRock 01 |D2= terraRock 01 |E2= | |A2= |B2= terraRock 01 |C2= terraRock 01 |D2= terraRock 01 |E2= | ||
| Line 136: | Line 118: | ||
|Output= Stone Shovel Head | |Output= Stone Shovel Head | ||
}} | }} | ||
| − | |||
| − | |||
| − | |||
| − | |||
| − | |||
| − | |||
== Basic Resources: Straw and Wood == | == Basic Resources: Straw and Wood == | ||
Revision as of 03:30, 16 September 2019
| This page is a work in progress. Refrain from making major edits to it until this page is finished.
|
Contents
- 1 Welcome to TFC+
- 2 User Interface Differences
- 3 Your First Day
- 4 Basic Resources: Straw and Wood
- 5 Shelter: Waiting Out the Night
- 6 Beyond the First Night
- 7 Music
- 8 Leaving the Stone Age
Welcome to TFC+
This guide will help new players through the early game with a focus on the differences between TFC+ and vanilla Minecraft. Players who already have experience with TerraFirmaCraft might want to look at Differences from TFC instead.
User Interface Differences
Right away, you can see that there are some obvious differences between TFC+'s HUD and the vanilla Minecraft HUD.
Health
![]() Instead of hearts, HP is shown by a red bar. When you first spawn, you have a maximum of 1,000 HP. Your max HP will go up or down based on your nutrition and XP. Health regenerates slowly over time if your hunger bar is at least 25% full. Mob health is also higher, but they are still weaker than players.
Instead of hearts, HP is shown by a red bar. When you first spawn, you have a maximum of 1,000 HP. Your max HP will go up or down based on your nutrition and XP. Health regenerates slowly over time if your hunger bar is at least 25% full. Mob health is also higher, but they are still weaker than players.
Hunger
![]() Instead of shanks, hunger is shown by a green bar. Each stack of food in TFC+ can weigh up to 160 ounces.
Players have a stomach that can hold 24 oz and can eat 5 oz in one bite. The exception to this is sandwiches, which can be eaten in a single bite. You can gain saturation and therefore eat less by eating salads and sandwiches instead of raw ingredients.
Instead of shanks, hunger is shown by a green bar. Each stack of food in TFC+ can weigh up to 160 ounces.
Players have a stomach that can hold 24 oz and can eat 5 oz in one bite. The exception to this is sandwiches, which can be eaten in a single bite. You can gain saturation and therefore eat less by eating salads and sandwiches instead of raw ingredients.
The hunger bar slowly goes down even if you are standing still or sleeping. It also goes down when you do actions like breaking a block or attacking. You can not starve to death in TFC+, but it is not good to have a low hunger bar. When your hunger bar is below 25%, you will get negative effects, like weakness and fatigue. If your hunger bar is empty, your nutrition goes down 3x fast. Low nutrition gives you lower max HP. When all of your nutrition is empty, you will have a max HP of 50. At 50 HP a hostile mob or fall damage can very easily kill you.
Thirst

![]()
Thirst is shown by a blue bar. The thirst bar slowly goes down over time even if you stand still or sleep. The thirst bar goes up when you drink fresh water. TFC+ has fresh water and salt water. Cattails and pond weed only grow in fresh water.
You can drink fresh water by right-clicking an empty hand on a block that is in the water. You will hear a drinking sound, and your thirst bar will go up. You can hold right-click to keep drinking until your thirst bar is full. Once you make clay items, you can craft a ceramic jug to carry water with you. Sprinting and jumping will quickly lower your thirst bar. When the thirst bar is below 50%, you can not sprint. When it is below 25%, you will get a Slowness II potion effect. If the thirst bar is empty, the current ambient temperature is above 35, and you are under the sky, you will take damage. This simulates a heat stroke.
Body Temperature
Body Temperature is shown by a bar on the lower right side of the screen. Green temperatures are comfortable, blue are too cold, yellow and red are too hot. If your temperature goes too far from green, you will have negative potion effects and can even take damage. Many things affect body temperature: clothing, being in water, drinking water, and being near a campfire. The temperature of the world around you is affected by season, latitude, elevation, and time of day.
Experience
As XP levels go up, the player's max health, max thirst, and alcohol tolerance go up too. A player with higher XP can take more damage, survive longer without water, and drink more alcohol before getting negative effects. There is no enchanting or tool repairs in TFC+, so you keep your XP unless you die.
Inventory and Crafting Grid

Just like in vanilla, you start with a 2x2 crafting grid in your inventory. Metal tools are needed to expand this grid to the full 3x3 so you will not be able to expand your crafting grid while you are in the stone age. Along the right side of the inventory interface, you will see 4 tabs. These let you see your nutrition levels, an in-game calendar complete with different seasons throughout the year, and your skill levels.
Your First Day
Night is dangerous and you have only a few hours. If you want to survive to see tomorrow, it's time to get busy sorting out some basic equipment, shelter, fire, and maybe water, and food.
Sticks and Stones
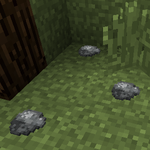
Punching trees won't do you any good in TFC+. You need tools, and you start with sticks and stones. On the ground you will find stones. Collect them by breaking the block, or by right-clicking them. Collect sticks too. Sticks can be found laying on the ground underneath trees or on beaches. You can also punch leaf litter which will have a chance to drop sticks. When you have several of each, it's time to craft.
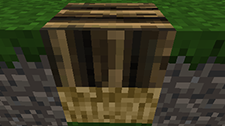
Knapping
Stone tool heads are crafted by hitting stones together to break them into useful shapes. This is called knapping. Stones are knapped into tool heads which can be attached to a stick to make a tool. To knap stone, hold two or more rocks in your hand and right-click on the ground.
| |
||||||
The knapping interface is a 5x5 grid. Clicking on a square of the grid will break off that piece of stone. Be careful where you click. If you make a mistake, you can't undo it and you may have to start again. Once you knap the stone into the right shape, a tool head will appear on the right. Take the tool head and craft it with a stick (or a bone) in the crafting grid to create a stone tool.
| |
| ||
| | |||
| | |||
Finished tools do not stack, but tool heads do. At night when you are hiding from monsters, you can knap extra tool heads to keep in your inventory. Then during the day, you can quickly craft new tools as you need them. Tools cannot be repaired in TFC+, so it’s okay to use a tool until it breaks. The tools you will want to make right away are a knife, an axe, and a maybe a shovel. With these tools you can get food, simple clothing, and shelter.
Knife
Knives are weak melee weapon, but better than bare hands. They are mainly used as a tool. With a knife, you can remove decay from food, process cereal crops, cut food into smaller pieces, collect straw, and turn furs and animal hides into leather or clothing.
| |
| |||||
Axe
You can’t punch down trees in TFC+. You need an axe to fell a tree. Axes can also be used as a melee weapon.
| |
| |||||
Shovel
Digging by hand is very slow. Use a shovel gather dirt, clay, gravel, and sand faster. It can also be used as a melee weapon.
| |
| |||||
Basic Resources: Straw and Wood
Now that you have some basic tools, you can start collecting the resources you need to survive.
Straw
Breaking grass with a knife to get straw. Get a lot. You will need straw to make your first clothing, your first storage container, and your first building block.
Grass Clothing
Grass clothing gives heat resistance with the exception of the grass cloak, which gives cold resistance. Craft grass clothing by right-clicking the ground while holding holding 5 or more straw in your hand. Grass clothing does not require sewing. These items have lower durability than other clothing, but are easy to make.
The straw hat gives a small heat resistance bonus. If a straw hat is crafted in the Asia region, it will have a prism shape instead of the default flat top shape.
| |
| |||||
The Grass Shirt gives a small heat resistance bonus.
| |
| |||||
The Grass Skirt gives a small heat resistance bonus.
| |
| |||||
Grass Sandals give a small speed bonus on sand.
| |
| |||||
The Grass Cloak gives a moderate cold resistance bonus and a moderate heat resistance malus. It is worn on the back slot (invisible slot to the left of the chest armor slot. This means it is not possible to wear the Grass Cloak and carry a large ceramic vessel or barrel at the same time.
| |
| |||||
The Straw basket works like a small chest.
| |
| |||||
Wood
Wood is gathered by chopping down trees with an axe. If you break the bottom log of the tree with an axe, it will break the entire tree into logs and sticks. If your axe does not have enough durability to chop down the entire tree,only the top of the tree will be chopped and the axe will break. Trees can drop large logs, normal logs, and sticks. Large logs can be split into normal logs by placing them in your crafting grid with an axe. Logs are stored in log piles. Create a pile by right-clicking a solid block with a log in your hand. The wood pile can hold 4 stacks of 4 logs. Right-click a partially full log pile with logs in your hand to quickly add them to the pile. Taking all logs from the pile will destroy the log pile block. A log pile can be used as a simple building block, but you can not place a new pile on top of another pile until the bottom pile is full.
Shelter: Waiting Out the Night
Once you have gathered materials and created your first tools, you will probably want to start working on some form of shelter. You cannot mine stone, and building out of dirt is not an option. You will have to use more primitive methods.
Gravity
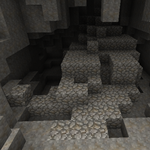
In vanilla, sand and gravel blocks are affected by gravity. In TFC+, dirt and cobblestone are also affected by gravity. Gravity-affected blocks do not stay in a tall stack like in vanilla. Instead, they will fall sideways to form a pile. This means that if you try to dig into dirt or build walls with dirt or cobble, the blocks will fall down. No dirt house for you.
Clay

On the other hand, clay blocks are not affected by gravity. If you find a clay deposit, you can dig out the dirt underneath it to make a quick and easy shelter. Clay deposits can be found by the patches of goldenrod flowers that grow on top of them.
Thatch
Thatch is one of the earliest building blocks in TFC+. Craft thatch by making crafting together 4 straw in your crafting grid.
| |
|
| |
| | |||
| |
| ||
Thatch blocks are not affected by gravity so you can use them to create a roof for your shelter if you aren't building underneath a clay deposit. You can also use them for walls, but be aware that players and mobs can pass through thatch blocks. Hostile mobs will not notice you if you stay hidden inside a thatch shelter, but if a mob has already seen you it may follow you through a thatch wall. Thatch is also extremely flammable, so don't build it too close to heat sources.
Beds

You can make a simple straw bed to sleep through the night and set your spawn point. Make a straw bed by placing two thatch blocks next to each other on the ground, and right-clicking on the thatch with a large rawhide. Large rawhide will drop when a horse is killed. It can also be obtained by crafting a large bear fur with a knife. It's unlikely that you will get the rawhide before your first night, but that's okay. You will have plenty of knapping and other things to keep you busy through the first night or two. Sleeping will make your hunger and thirst bars go down 50% less than if you stay awake.
Firepit
Now that you have some logs and sticks, you can create a firepit. A firepit will allow you to make torches, to cook food, and to stay warm. To make a firepit, first make a fire starter out of two sticks.
| |
| ||
| | |||
| |
|||
Then drop three sticks onto the ground. Make sure they all land on the same block. Hold down right click that block with the fire starter in your hand. The fire starter will draw back and play a sound. It may take several tries, and even more than one fire starter, to light the fire. It helps to drop a piece of straw with the sticks. When the fire is lit, a firepit appears on the ground. The firepit is fueled by logs. You can either drop logs onto the fire or open the interface by right clicking on the fire and ad logs to the fuel slots on the left. When a firepit goes out, you'll need to make sure it has fuel and use a fire starter to relight it. Relighting is instant. Rain or snow will put out a firepit. Walking over a lit firepit will set you on fire. If you have raw meat, you can cook it in the firepit. Standing near a lit firepit will give you cold resistance. Standing there for a longer time will give you up to two minutes of cold resistance when you leave the firepit.
Torches
Put one stick into the top slot of a lit firepit. After a few moments, it will output two lit torches. You can make more by placing a lit torch in the world and right-clicking on it with sticks in your hand. This will turn the sticks into lit torches.
| |
|
||||||
| |
|||||||
| |
|||||||
| |
|||||||
| |
|||||||
| |
|||||||
| |
|||||||
Rain or snow will put out lit torches. Torches will also go out after 2 in-game days. You can relight an unlit torch by right clicking it with a lit torch in your hand.
Spawn Protection
After you have spent a fair amount of time in an area, TFC+ implements a hostile mob spawn protection system that prevents mobs from spawning in areas that . Areas with this hostile mob spawn protection will not spawn hostile mobs regardless of the current light level.
Beyond the First Night
Now that you have a shelter and can survive the night, it's time to learn more about the world around you, and maybe secure some food.
Weapons and Combat
At the very beginning of the game, it’s best to avoid combat with hostile mobs. TFC+ has implemented different damage types: piercing, slashing, and crushing. Different weapons will do different types of damage, and a mob can be strong or weak against different types of damage. For most mobs, the best stone-age weapons are the axe (slashing damage) and the javelin (piercing damage). Knives can do either slashing or piercing damage (press M to swap knife modes), but they don't do much damage. Skeletons are immune to piercing damage and weak to crushing damage, so the most effective stone-age weapon against them is a hammer.
Hammer
In the stone-age, hammers can be used as a melee weapon that deals crushing damage.
|
|
Bow
The unstrung bow can be crafted with poles and sinew. Place the unstrung bow and some sinew in your grid to make a bow. Arrows fired from the bow do piercing damage and can be retrieved. Arrows are crafted using rocks, sticks and feathers. Feathers can be plucked from live pheasants or chickens by crouching and right-clicking on them with an empty hand. This does a small amount of damage to the bird. Feathers will also drop when birds are killed. They can also sometimes be found by breaking leaf litter blocks.
| |
| ||
| | |||
| |
| ||
| |
Spear and Javelin
Spears and javelins are crafted from poles. Spears are easier to craft than javelins (you only need to craft a pole with a knife), but javelins have more durability and do more damage than Spears. They can be used as melee weapons and have a long reach. They can also be used as ranged weapons. Holding right-click will draw it back, and letting go will throw it. Spears and javelins do piercing damage and can pass through enemies. They can be retrieved. After throwing, the slot will refill with another if you have more in your inventory.
|
|
Climate & Seasons
Instead of vanilla biomes, TFC+ uses a climate system. Rainfall, elevation, distance from the equator, and time of year determine which types of terrain, animals, and plants will generate in an area. Players will always spawn in the northern half of the map during the season of early summer. The equator is at coordinate 0 on the z-axis. The climate near the equator tends to be hot and dry. As you move away from the equator, north (-z) or south (+z), the climate becomes tropical, then temperate, then Boreal, and finally polar climates at 30,000 blocks north or south.
Food
Food in TFC+ stacks by weight. A single stack can hold 160 ounces. You can combine smaller stacks of food by placing them together in the crafting grid. As a shortcut, you can also hover over a food item in your inventory and press the S key. Stacks of food can be cut in half by crafting them with a knife.
Food decays in TFC+, and as the decay a stack of food goes up, it decays faster. Decay is shown by the food’s durability bar. Hover over a food item to see an exact decay percentage in the tool tip. It is important to keep decay trimmed from food so it doesn't rot as quickly. To trim decay, craft the decayed food with a knife. As a shortcut, if you have a knife in your inventory, you can open your inventory and press the D key to trim the decay off of all food in your inventory. Food stored in cooler temperatures will decay slower. Places that are blocked from the sky, that are higher in elevation, and that are farther from the equator will be cooler. Food that has been cooked will also decay slower.
Seaweed
Seaweed is a useful survival food. It can be found growing in the salt water near beaches. Seaweed can be harvested quickly by right-clicking the block it grows from with a knife. Harvested seaweed will not grow back.
Vegetables and Grains
These can be gathered from mature crops which spawn randomly in the world every spring/summer. Vegetables can be eaten raw. Grains must first be refined by crafting them with a knife. Refined grain decays much slower than unrefined grain.
Meat
Animals drop meat (or furs) when they die. A player with a higher butchery skill will get more meat from killing an animal. Raw meat may poison you, especially if it has decay.
Wild animals (bears,deer, pheasants, wolves, fish and squid) will continuously spawn and despawn in the world. But animals that can be tamed and bred as livestock (cows, horses, sheep, pigs, and chickens) only spawn one time, the first time an area is loaded. These animals do not despawn, and if they are killed, they will not respawn.
Tamable animals are either male or female and if you are going to kill them for food, it is a good idea to leave at least one male and one female alive so that you can domesticate and breed them in the future.
Fish can be found swimming in lakes, and squid can be found swimming in saltwater. Both animals can be attacked with weapons. Fish can be caught with a fishing rod. The rod is crafted from poles. Players with a higher butchery skill will get more meat from these small animals. But these animals are small and they will always drop small amounts of food.
Fruit

Berry bushes can be broken and replanted on grassy dirt.
Agriculture

Crops spawn randomly in the wild between the seasons of spring and late summer, and have a chance to regenerate during those seasons every year. Breaking a crop will always drop seeds. The crop will only give food along with those seeds if it is mature, so it’s a good idea to wait until a crop has finished growing before harvesting it. Most crops take several in-game months to reach maturity from the time they are planted. It is possible for crops to freeze to death during the colder seasons.
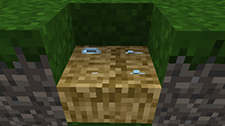
Hoe
Hoes can be used to turn grass into farmland. It can also be used to check the hydration of farmland, and maturity of crops. The mode of the hoe can be changed by pressing the M key with the hoe in your hand. Hoeing grass blocks to get farmland plots will full nutrients. If you till a bare dirt block, it will have no nutrients and crops will not grow well on it.'
![]() < Mode Indicator
< Mode Indicator
![]() Preparation - Standard use, tilling soil into farm-plot.
Preparation - Standard use, tilling soil into farm-plot.
![]() Water - Highlights the target farmland with black: no water access, and blue: water access.
Water - Highlights the target farmland with black: no water access, and blue: water access.
![]() Harvest - Highlights the farmland with a green display for finished crops and red for those whom are still growing into maturity.
Harvest - Highlights the farmland with a green display for finished crops and red for those whom are still growing into maturity.
|
|
Livestock

TFC+ implements an animal familiarity system for livestock. Animals that have been familiarized can be bred. Sheep that are familiarized can be shorn for wool. Horses that are familiarized can be saddled. Dogs that are familiarized can be commanded to sit and will not attack your livestock. To see an animal’s familiarity, look at the animal while crouching. Above the animal will be a heart to show the level of familiarity. Familiarity is increased by interacting with the animal. Cows, sheep, pigs and chickens familiarize when they are fed. To feed an unfamiliarized animal, crouching and right-click with refined grain in your hand. Horses are familiarized by attempting to ride them. Dogs are familiarized by petting (right-clicking). Familiarization takes several days. You will see the level of the heart filling up over time. If you miss a day of training, the heart level will go down. Once you reach a certain level, a white border will appear around the heart. When this happens, you will no longer lose familiarization if you stop training. When an animal is fully familiarized, the heart will turn gold. If an animal came from the wilderness, it’s max level will be less than a full heart. Animals that are born from your livestock will have higher max levels. Once you familiarize a male and female animal, you can breed them by feeding until hearts appear. If they are near one another, the female will become pregnant and will give birth after several months of pregnancy. The offspring of familiarized livestock will start life with partial familiarity.
Ceramics
Clay can be used to create ceramic items for storage, meal preparation, and tool-making. Usually, clay is easy to find, but because it is generated based on rainfall, you may not find deposits in dry biomes. But even where there isn’t enough rainfall to generate clay, it can be found in rivers. Breaking a clay block will give you clay balls. Hold 5 or more clay balls in your hand and right-click the ground to bring up the clay forming interface.
| |
||||||
Clay items need to be fired in a pit kin. To make the kiln, dig a 1x1 block hole in the ground. This is your pit kiln. Place a clay item in kiln by right-clicking the bottom of the pit. You can place up to four small items or one large vessel in the pit. Now load the kiln with fuel by right-clicking with straw in your hand. The pit will slowly fill with straw. 8 pieces are needed. Now do the same with eight logs. To light the kiln, you can use a fire starter, or you can drop a torch onto the block. The fire will burn for several in-game hours. When the fire goes out, the straw and logs will be gone, and your clay items will be ceramic items. You can collect each one by right-clicking with an empty hand, or you can collect all of them at once by breaking the transparent block at the bottom of the kiln.
Important: The pit kiln will not work as pictured below. These images are in cross section, with the required surrounding blocks removed for visibility.
Items
Straw
Logs


Warning: fire from a pit kiln will light nearby flammable blocks (and players) on fire. Pit kilns will not be put out by rain or snow.
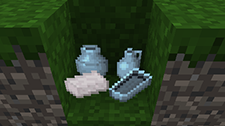
Ceramic Jug
One of the first ceramic items you will want to make is a ceramic jug, so you can carry drinking water with you.
|
| |||||||||||||||||||||||||||||||||||||||
Fill the jug by right-clicking it on a source block of fresh water, or on a large vessel that contains at least 1,000 mB of fresh water. You cannot fill a jug with flowing water, salt water, or water from a hot spring. You can drink from a jug of water by holding down right-click. Drinking will fill your thirst bar much faster than drinking with your hand. If your thirst bar is very low, it may take more than one jug of water to fill it completely. There is also a very chance the jug will break when you drink from it, so it is a good idea to keep more than one. The jug can be placed on a solid block by crouching and right clicking the block with the jug in your hand. If you try to drink from an empty ceramic jug, you will blow into it and play a note. Looking up or down will change the pitch of the note.
Ceramic Vessel
Ceramic Vessels are used for storing small items, for preserving refined grain, and for processing items in the pit kiln.
|
| |||||||||||||||||||||||||||||||||||||||
Open a ceramic vessel by right-clicking with the vessel in your hand. The vessel has room for four stacks of items. Only smaller items can fit into a vessel. Vessels can still be stored in your inventory or placed on the ground, by crouching and right-clicking. Refined grain stored inside of a vessel will decay at 50% slower. Seashells or dirt, gravel, or sand from flux stones (limestone, dolomite, chalk, and marble) can be placed into a vessel and fired in a pit kiln. They will burn down into lime, which is used to make leather and glass.
Large Vessel
A large vessel is a stone-age version of a barrel. Large vessels can do many of the liquid recipes done by barrels with the exceptions of alcohol and vinegar. Tip: Unlike the other pottery items, unfired large ceramic vessels will take up the entire block and can only be fired one at a time.
|
| |||||||||||||||||||||||||||||||||||||||
Liquid Storage
The vessel can be filled with water by using it like a bucket on a water source block. If an empty large vessel is left open and exposed to the sky while it is raining it will slowly fill with fresh water. A sealed vessel can be broken and moved. The player can only carry one sealed large vessel at a time. To carry it, place it in your back slot (an invisible slot to the left of the chest armor slot). Until you put it in the back slot, you will see a message: "Overburdened" and will not be able to move.
Item Storage
Alternatively, large vessels can be used for item storage. By clicking the chest tab in the vessel’s interface, you can show its nine storage slots, which can hold medium or smaller items. They can be placed on the ground and used in a manner similar to chests, or they can be sealed and carried on your back as a backpack.
Retting Natural Fibers
Seal 25 flax or 25 jute plants into a large ceramic vessel full of water to process them into into linen or jute fibers. Linen fibers can be spun into thread with a spindle, and jute fibers can be crafted into a rope, used for handling animals.
Tanning
A large vessel can be used to process rawhide into leather. There are several steps to leather tanning. It might be easier to use three vessels (one for each step) if you have a lot of rawhide to process. First, fill a vessel with fresh water and add 10 lime. This will consume the lime and turn the fresh water into lime water. Next seal the rawhide in the vessel of lime water. After a time, it will consume some of the lime water and output a soaked hide. The next step is to scrape the softened bits of flesh from the soaked hide. You will need a large log placed on its side to use as a workbench. Right click the log with the soaked hide in your hand and it wil be spread out on the top of the log ready to be scraped. With a knife in your hand, right-click on the hide. You will see a bit of the flesh disappear from the hide. Continue clicking on the pink fleshy patches of hide until it is all scraped clean. Then right click once more to remove the hide from the log. Next, seal the scraped hide in a vessel full of fresh water for a time. It will consume some of the water and output a prepared hide. The last step is to tan the prepared hide. You will need a large vessel of tannin to do this. To make tannin, seal a tannin-rich log (oak, birch, chestnut, Douglas fir, hickory, maple, sequoia, acacia, fever tree, mahogany, or limba) in a large vessel full of fresh water and wait for a time. The log will be consumed and the water will turn to tannin. Seal a prepared hide in a vessel of tannin. After a time some of the tannin will be consumed and the prepared hide will turn into leather.
Fruit Tree Propagation
Large ceramic vessels can also be used to propagate fruit trees. To create a fruit tree sapling you place the large vessel on the ground, put 40 oz of fruit in the center storage slot, and put 2 dirt in the 8 surrounding slots. Leave the vessel unsealed. Once the fruit reaches 50% decay, it will consume some of the dirt and a fruit tree sapling will be produced.
Bowls
|
| |||||||||||||||||||||||||||||||||||||||
Ceramic Bowls are used to make salads, which are the first meal you can make in TFC+. Meals can be eaten faster than raw foods, they provide extra saturation, so you won't need to eat as often. Meals are assembled in the meal prep area. To create a meal prep area, right click a solid block with a knife in your hand. To create salad meals, click the tab on the top of the meal prep area interface with the salad icon. You can add a combination of fruits, vegetables, grains, and meats to the food slots, and add ceramic bowls on the right. If enough food and bowls are available, clicking the “create” button will output a meal. The ingredients and bowls can be stored in the meal prep area and will render in the world above the area. The ceramic bowl is destroyed when the salad is eaten. If you intend to eat a lot of salads, you should make a lot of bowls.
Spindle
The spindle is a tool used to process fibers into threads. To craft a spindle start by crafting a stick and a clay ball together to make a clay spindle. This needs to be fired in the pit kiln. After firing, place it in your crafting area to get a ceramic spindle head. Craft the spindle head with a stick to get a spindle. To use the spindle, place it in your crafting grid with flax fibers to output linen string, or with wool to get wool yarn.
Blowpipe
The blowpipe is used to create glass bottles. Glass bottles are an upgraded version of the ceramic jug. They never break, they stack up to 64 in a single slot, and they fill your thirst bar faster than a jug. To make a blowpipe, craft clay into the shape below and fire it in the pit kiln. To use the blowpipe, you need a ceramic vessel of molten glass. This is made by placing equal parts lime, soda ash, and silica sand in a ceramic vessel and firing it in a pit kiln. Soda ash is made by cooking seaweed in a firepit until it completely burns up. Silica sand can be found on some beaches. If you hover over a block of sand in your inventory, it will say “silica” in the tool tip if the sand can be used to make glass. After firing the vessel of glass ingredients it will contain molten glass. To load the blowpipe with glass, right-click while holding the vessel to open its interface. You will see that it has only one slot. Place the blowpipe into the slot and it will slowly fill with molten glass. When it is full (100 units) remove it from the slot and close the vessel interface. Now right-click with the loaded blowpipe in your hand to blow a bottle. Repeat this process of loading and blowing to use up the molten glass. After a time, the glass will harden in the vessel. If there is enough to make more bottles (more than 100 units) you can melt the glass by firing it in the pit kiln again.
Fur Clothing
Bear furs and wolf furs can be cut with a knife and sewn with a needle and thread to make fur hats, boots, and coats. These items will give the player resistance to cold.
To cut furs, right click the ground while holding a fur. You must have a knife in your inventory. The fur cutting interface is similar to the stone knapping interface. Clicking a space on the 5x5 grid will cut it away. If you make a mistake, you cannot undo it and that fur will be wasted (unless you can still make a different recipe with the shape you have made)
Next, you will need a needle and thread. To get a needle, hold left-click with a bone (or bones) in your hand. As you hit the rock with the bones, they will start to break. They will drop bone fragments, and there is a chance they will drop a bone needle. Once you have a needle, place it in your crafting grid with linen thread, wool yarn, or sinew to create a threaded needle.
To sew your cut fur pieces into clothing, right click on the ground while holding some cut fur pieces in your hand. This will open the sewing interface. Place the cut fur pieces that are needed to make the clothing item you want into the interfaces inventory slots and a sewing pattern will appear. Now take your threaded needle and sew along the red lines in the pattern. Sew by pressing and holding the left mouse button. (Note: sewing takes place at the center of the needle icon, not at the point of the needle). To inspect your work, put the needle back in your inventory. Areas that were sewn well will turn green. Areas that need to be sewn or that should not have been sewn will be red. You can remove stitching by using a knife on the pattern and holding right-click. Stitching is cut at the point of the knife icon. Place your knife back into your inventory to update the pattern. When all the seams are sewn properly and no stitches are out of line, The clothing item will be output into the slot on the right.
Leather Clothing
Leather can be cut the same way as fur to make cut leather pieces which can be sewn into leather armor and items. Leather hat, tunic, pants, and boots or sandals are worn in the armor slots. They cannot be worn underneath similar fur items. They do not provide heat or cold resistance, but they do provide light armor.
Quiver
The quiver is worn on the back slot (left of chest armor slot). It can hold arrows, spears, or javelins, and when these weapons are fired, they will be replaced in your bow or hand from the quiver. You can see the contents of the quiver in bottom left of the screen.
Saddle
The saddle can be placed on a familiarized horse to ride it. You will also need a rope in your hand to steer the horse.
Staff
The staff is crafted with a pole and a leather strap. When held in the hand, it gives a bonus to walking speed. It does not make you sprint faster. It can also be used as a weak melee weapon.
Music
Conch
The Conch is an instrument made by crafting a spiral-type seashell in the crafting grid. It can be crafted again to turn it back into a seashell. The Conch is played by right-clicking while holding it in the hand. It makes a horn-like noise. The pitch cannot be changed.
Blowing Horn
Blowing horns are made by crafting a horn with a knife. Horns are a semi-rare drop from bulls. It is played by right clicking while held in the hand, similar to the Conch.
Flute
Flutes are more difficult to make than a conch or blowing horn, but they are able to play complex tunes. To craft a flute, you need a Hollow Bone, which is a rare drop from chickens and pheasants. Craft a hollow bone with a knife for a 25% chance of obtaining a flute. The flute is played by right-clicking while holding in the hand. Different notes can be played by pressing different combinations of the F, G, H, J, and B keys while blowing the flute.
Leaving the Stone Age
Beyond the stone-age is the copper age, where you begin processing ores into cast metal tools. Metal tools will give you access to new kinds of clothing, foods, food preservation, armor, weapons, instruments, and transportation. To create your first metal tool, you'll need at least 10 nuggets of copper ore. There are three ores of copper: malachite, tetrahedrite, and native copper. It’s okay to mix and match. You just need ten total. In the stone age, there are two ways to gather the ore. The most common way is by finding nuggets of or on the ground among the rocks. These ore nuggets indicate that there is a vein of ore underground, so be careful to remember or mark and ore location when you collect surface ores so you can find the location later when you have a pickax and are ready to mine. If you can’t find the ores you need on the ground, you can pan for ore. This method is slow, but reliable and can be done almost anywhere. Create a gold pan by placing a ceramic bowl in the crafting grid. Since pans break with use, it’s a good idea to make several. With an empty pan in hand, right click on a gravel, sand, or dirt block to fill the pan. There is a chance that the block will be consumed. Gravel is more likely to produce ores, than dirt or sand. Now find or create a flowing water block. With the filled pan in hand, click in the flowing water block to use the pan. Each time you pan there is a small chance that an ore nugget or a gemstone will drop. There is also chance that the pan will break. After panning five times, the pan will empty. Refill the pan and repeat until you have at least 10 ore nuggets.
You can now process the ore and leave the stone-age. You've done it!