Difference between revisions of "Stone-Age Guide/ru"
(Created page with "=== Гончарное дело === Глиняное отложение на склоне горы с золотарником.") |
(Created page with "==== Яма для обжига ====") |
||
| Line 388: | Line 388: | ||
After you have made a clay item, it must be fired before it can be used. To do this, you will need to make a Pit Kiln. | After you have made a clay item, it must be fired before it can be used. To do this, you will need to make a Pit Kiln. | ||
| − | ==== | + | ==== Яма для обжига ==== |
To make a Pit Kiln, dig a pit in the ground, and {{key|Shift}} + {{key|RMB}} the items to be fired into the pit. Then, add eight straw, then eight logs, by right clicking on the pottery. | To make a Pit Kiln, dig a pit in the ground, and {{key|Shift}} + {{key|RMB}} the items to be fired into the pit. Then, add eight straw, then eight logs, by right clicking on the pottery. | ||
Revision as of 09:21, 20 April 2020
Contents
Добро пожаловать в TFC+!

Terrafirmacraft+ это переосмысление того чем Minecraft мог бы быть, с акцентами на том, чтобы сделать игру более правдоподобной. Мод подходит опытным игрокам ванильного Minecraft'а, которые чувствуют что обычному Minecraft'у не достаёт деталей и сложности, и хотят тот уровень реализма, который ванильный Minecraft не может им предоставить.
Это руководство поможет новым игрокам начать игру, делая акценты на различиях между TFC+ и ванильным Minecraft'ом. Те же игроки, которые уже имеют опыт с оригинальным TerraFirmaCraft, могут просмотреть страницу Различия с TFC. Если вы нашли ошибку или у вас есть вопрос - вы можете заглянуть в Discord или Subreddit для помощи.
Некоторое количество переводов Terrafirmacraft+ доступно, но большинство из них неполны. Вы можете помочь в переводе мода на странице Перевод.
Руководство предполагает что вы уже установили Terrafirmacraft+, ежели нет - посетите страницу Установка для помощи.
Начало игры
HUD и Статистика
Когда вы создали мир, вы скорее всего уже заметили что ваш HUD слегка отличается от оного в ванильном Minecraft'е. Этот параграф поможет вам пройти через все перипетии различных полос и вкладок в HUD'е мода.
Здоровье
![]()
Первое что вы видите отличного от ванильных индикаторов - полоса здоровья. Вместо сердец, в TFC+ здоровье показывается красной полосой. Вы начинаете с максимумом в 1000 ХП, и это число может варьироваться в зависимости от различных факторов, таких как насыщение и уровень опыта. Полоса будет медленно восстанавливаться со временем, пока ваш голод превышает 25%, но даже с полным желудком скорость регенерации не увеличится. Вы можете ускорить процесс заживления ран сидя в горячем источнике или использованием стерильного бинта, который восполняет 100 ХП.
Игроки также могут быть ранены, что подразумевает множество негативных эффектов. Вы получаете ранение если удар наносит вам 20% и больше здоровья за раз. Перелом кости замедляет скорость передвижения, тогда как рана или порез напрямую наносит урон до тех пор пока эффект не пройдет. Переломы могут появиться только от дробящего урона или падения, раны - от колющего урона, а порезы - от режущего. Эффекты могут быть залечены с помощью медицины.
Голод
![]()
Вместо ножек, голод показан зеленой полосой.
В отличие от ванильного Minecraft'а что использует абстрактные "значения насыщения", система голода в TerraFirmaCraft+ базируется на массе еды. TerraFirmaCraft+ использует имперскую систему мер - унции. Однако они никак не связаны ни с какими другими мерами в игре, так что если концепция унций вас смущает - можете думать о них как о "единицах еды" или "кусочках". Каждый стак еды в TerraFirmaCraft+ может весить до 160 унций.
Игроки медленно теряют голод по истечении нескольких дней, даже если они не движутся. Когда игрок очень голоден, у него начинают появляться негативные эффекты, например - Усталость, до тех пор пока он не поест. Когда уровень голода исчерпывается, игрок начинает быстро умирать от голода.
Жажда

![]()
Terrafirmacraft+ преподносит идею жажды. Игроки медленно накапливают жажду, страдая от Слабости и Замедления, и тепловых ударов, когда её уровень становится критическим. Жажда показана синей полосой. Так же как и голод, она медленно уменьшается, даже если игрок неподвижен. Вы можете пить пресную воду из водоёмов по всему миру, отличающихся от других наличием кувшинок и рогоза. Потому, поиск источника свежей питьевой воды очень важен для выживания.
Чтобы пить воду, игроки должны нажать ![]() Right Click на блоке под водой. Вы можете зажать
Right Click на блоке под водой. Вы можете зажать ![]() Right Click чтобы пить пока не утолите жажду.
Right Click чтобы пить пока не утолите жажду.
Одна из основных целей в начале игры - создание керамического кувшина для транспортировки в нем пресной воды, что позволит вам исследовать более далёкие земли, в которых её может и не быть.
Опыт
Система опыта показывает жизненный опыт, и с каждым уровнем увеличивает максимальное здоровье игрока, жажду и стойкость к алкоголю, позволяя им получать больше урона, выживать дольше без воды и пить больше алкоголя до наступления негативных эффектов.
В отличие от ваниллы, здесь нет зачарований или ремонта инструментов, чтобы использовать куда-то ваш уровень опыта, так что единственный способ снизить ваш уровень - смерть.
Температура Тела
Температура тела показывается термометром в правом нижнем углу экрана. Зеленая область его показывает комфортную температуру для игрока. На температуру вашего тела влияет время года, климат и окружающие вас блоки. Если игрок перегрелся или переохладился - он будет получать негативные эффекты, такие как Замедление и Слабость. Он также не сможет спать на соломенной кровати. Также вы будете тратить больше голода и жажды, так как тело "потеет" чтобы охладиться или сжигает калории для нагрева.
Температура тела может контролироваться с помощью Одежды. Крыши также создают небольшую защиту, как и нахождение в тени или в пещере, что защитит игрока от тепла.
Инвентарь
Инвентарь в Terrafirmacraft+ содержит четыре вкладки: Инвентарь, похожий на ванильный инвентарь, позволяет вам взаимодействовать и создавать предметы; Навыки, показывающие ваши умения в различных занятиях; Время, показывающее дату, время года и день недели; Питание, показывающее пять категорий еды, которые вы должны есть чтобы поддерживать максимальный уровень жизни.
В отличие от ваниллы, создание предметов происходит прямо в инвентаре. Игроки начинают с 2х2 Сеткой, которая может быть увеличена с верстаком до 3х3. Хотя, в отличие от ваниллы, верстак не является блоком, а используется только для разблокировки сетки 3х3.
| | |||
Первый день: Инструменты, Свет и Одежда
Цель первого дня - подготовиться к ночи и длительному выживанию игрока. Очень важно осмотреть местность вокруг чтобы увидеть какие ресурсы вам доступны. Если вы видите вокруг равнину с травой, кустарниками и булыжниками, уходящую вдаль - вам будет проще найти кусочки металлов и животных для охоты. Ежели вы видите вокруг берег океана - вам будет проще найти пресную воду и водоросли. Ну а если вы видите вокруг глубокий влажный лес - найдете глину, пресную воду и древесину.
Что вы не можете делать
Вы должны были заметить, что вы не можете бить рукой деревья чтобы получить древесину. Это потому что древо развития в Terraformacraft+ абсолютно различается с таковым в ванильном Minecraft. Это значит что ваши первые инструменты сделаны из камня. В Terrafirmacraft+ нет такой вещи как деревянные инструменты, и трата своего времени на битьё дерева не даст вам в итоге ничего. Вы не можете сделать доски и, из-за этого, верстак в Terrafirmacraft+ - вам понадобится пила, которую вы можете только выплавить из металла.
В Terrafirmacraft+ нет такой вещи как каменная или деревянная кирка. В начале игры вы не копаете камень ради руды. Вместо этого есть другие способы получения металла и инструментов, без использования кирки. После нахождения металла вы сможете сделать свою кирку для того чтобы добыть больше металла.
Не рекомендуем бить землю рукой, даже если вы сможете сломать блок, он, также как и песок, гравий, камень и булыжник, подвержены гравитации в TerraFirmaCraft+. В отличие от ванильного Minecraft'а, подверженные гравитации блоки могут падать не только прямо вниз, но и скатываться с блоков. Это не даст вам возможности сделать дом из этих блоков.
Игроки, привыкшие к ванильному Minecraft'у, должно быть, задались вопросом: "Как же хранить предметы в Terrafirmacraft+?". Из-за того что доски сокрыты для вас за металлообработкой, альтернативой сундуку в ранней игре для вас будут Соломенная корзина, Большой сосуд, Керамический сосуд и Сумка из шкуры.
Беготня повсюду экономически невыгодна в TFC+ - ваш голод и жажда будут тратиться много быстрее. Вместо этого, Деревянный посох может быть использован для получения бонуса к скорости, вполовину от скорости бега. Мы поговорим о посохе позже в этой статье.
Факела в TFC+ поджигают горючие блоки вокруг. Перед тем чтобы поставить факел, рекомендуется очистить область вокруг от блоков что могут сгореть, включая траву, подлесок и листву. Чтобы осветить ваше прибежище, используйте костёр, о котором мы поговорим позже. Далее по прогрессу вы сможете сделать свечи, которые станут для вас приятным и безопасным источником света.
Палки и Камни
В Terrafirmacraft+ первое что вы должны сделать, вместо битья рукой деревьев, это сбор камней лежащих на земле. Как минимум 64 камня вы потратите за пару первых дней игры.
Изредка вы можете найти кусочки руды. Запомните или пометьте это место чтобы найти его позже - это важно.
Вам также понадобятся палки. Вы можете ломать листву рукой или найти их лежащими на земле. Также можете собирать топором кусты или подлесок чтобы получить палки.
Выбивание из камня
Выбивание это использование двух камней для создания каменных инструментов. Нажмите ![]() Right Click с двумя или более камнями в руке чтобы открыть интерфейс выбивания, пока вы работаете в нем, вы будете получать каменные осколки, полезные при крафте позже.
Right Click с двумя или более камнями в руке чтобы открыть интерфейс выбивания, пока вы работаете в нем, вы будете получать каменные осколки, полезные при крафте позже.
| |
||||||
Интерфейс выдалбливания это сетка 5х5, нажимая на квадраты которой вы убираете части камня. Будьте внимательны при этом, любая ошибка, сделанная вами, - необратима. Если вы успешно выстроите нужную форму для инструмента - его оголовье появится в слоте справа, заберите его и совместите с палкой или костью в обычном окне крафта чтобы сделать инструмент. Из оставшихся же осколком вы сможете сделать стрелы или использовать их для срезания травы вместо ножа.
Tip: Some of the tools can be knapped out differently than the below forms, feel free to experiment.
Knives are a weak melee weapon, and a useful tool. With a knife, you can gather seaweed, turn furs and animal hides into leather or clothing, process grain into cereal, and remove decay from food. Knives have two attacking modes, Stab and Slash, which deal different damage types. They can be swapped between by pressing M. Two knives can be crafted at once by mirroring the recipe on the other side. |
Топоры нужны для рубки деревьев, кустов и многого другого, но также, они являются отличным рубящим оружием. |
Shovels can be used gather dirt, clay, gravel, and sand. |
"Совет: Собранные инструменты не складываются друг с другом, но их оголовья - могут быть сложены до 32 штук в слоте. Ночью, пока вы прячетесь от монстров, можете повыдалбливать немного оголовий разных инструментов, чтобы иметь в инвентаре запас, тогда днём, если инструмент сломается во время использования, вы сможете быстро собрать новый, совместив оголовье и палку или кость."
Если вы успешно выстроите нужную форму для инструмента - его оголовье появится в слоте справа, заберите его и совместите с палкой или костью в обычном окне крафта чтобы сделать инструмент.
|
|
|
Древесина
Древесина добывается рубкой деревьев топором. Если вы сломаете нижний блок дерева им - все дерево выше будет срублено и повсюду будут разбросаны бревна и палки. Если же вашего топора недостаточно для рубки дерева целиком, то срубится только верхняя его часть и топор сломается.
Деревья бывают двух размеров: Обычные деревья что растут от лесов до равнин и из которых вы получаете обычные брёвна; И более редкие крупные деревья, из которых вы получаете крупные брёвна. Крупные брёвна могут быть разрублены на несколько обычных поленьев; Однако, не рекомендуем этого делать, учитывая то, что крупные брёвна достаточно редки и могут быть отличным материалом в строительстве.
Брёвна могут быть сложены в поленницы при нажатии ⇧ Shift + ![]() Right Click по земле. Только обычные брёвна могут быть в неё сложены, хотя вы и можете сложить крупные в уже созданную поленницу.
Right Click по земле. Только обычные брёвна могут быть в неё сложены, хотя вы и можете сложить крупные в уже созданную поленницу.
Брёвна могут быть вырезаны ножом в шесты, которые в свою очередь могут быть разломаны на палки.
| |
| ||
| | |||
| | |||
| |
| ||
| | |||
Вы можете воткнуть нож в бревно чтобы получать смолу со временем; Эта смола используется для создания различных предметов, таких как Деревянный посох или Примитивный бинт. Деревянный посох делается путем совмещения смолы и Шеста, и дает игроку 15% бонус к скорости при ходьбе с ним в руке. Это половина от скорости бега, но, из-за того что бег в Terrafirmacraft+ тратит очень много голода и жажды, рекомендуется использовать посох при ходьбе, вместо бега. Примитивный бинт используется при ранении игрока; Посмотрите статью Раны и Медицина для большей информации.
| |
| ||
| | |||
| | |||
Оружие
Weapons are important in order to hunt wild animals and defend yourself from monsters at night. Early game weapons, like tools, can be knapped from stone, or, in the case of the Wooden Spear, shaped from a pole. In Terrafirmacraft+, there are three types of damage: Slashing, Piercing, and Crushing. Slashing is effective against Endermen and Zombies. Piercing damage is effective against Bears, Creepers, Endermen, and Wolves, and Crushing is effective against Endermen and Skeletons. Axes deal Slashing damage, Javelins and Spears deal Piercing damage, and Hammers deal Crushing damage. The Knife has two modes, Stabbing and Slashing, which deal Piercing and Slashing damage respectively.
|
|
Javelin heads need to be crafted with a Pole in order to create the full Javelin, while Stone Hammers, like tools, need to be crafted with a Stick or a Bone.
Wooden Spears are an weaker version of the Stone Javelin. They can be crafted from a pole and a knife.
| |
| ||
| | |||
| | |||
Wooden Spears and Javelins will automatically refill from your inventory after one is thrown.
Hunting and Foraging
Finding a source of food and water is important for your long term survival. Only fresh water can be drunk; the process of finding and drinking fresh water is described in the Thirst section.
Водоросли
A good source of early-game food - if you are near the shore - is seaweed. Seaweed can be harvested using ![]() Right Click on the block below the seaweed while holding a knife. Once you have a few pieces of seaweed, you can stack them together by hovering over one piece of seaweed and pressing S to stack the seaweed together. Alternatively, the seaweed can be crafted together in the Inventory grid to stack them.
Right Click on the block below the seaweed while holding a knife. Once you have a few pieces of seaweed, you can stack them together by hovering over one piece of seaweed and pressing S to stack the seaweed together. Alternatively, the seaweed can be crafted together in the Inventory grid to stack them.
Мясо
If you cannot locate a shore, the next best source of food is meat. Animals can be found clustered in groups around the world. Do not attack them right away! In Terrafirmacraft+, animals are neutral mobs, and will attack the player if the player attacks them. As animals are also much harder to kill than in Vanilla, you should prepare yourself before you attack an animal.
Note: Do not underestimate animals! They have large amounts of knockback and damage. They are not harmless, like in Vanilla!
Stand away some distance from the animal, and hold ![]() Right Click to prepare your spear or javelin. Do not attack the animal directly with the javelin! Hitting an animal with a javelin deals far less damage than throwing it. Release in order to throw it. Be careful, as the animal will now try to attack you. Throw multiple spears in rapid succession, until the animal dies. In Terrafirmacraft+, animals drop as much meat as their body weight. This means that large animals will drop quite a lot of meat. You do not have to worry about picking up all the meat, as a few stacks will suffice for a few days. Be sure to pick up the Raw Hide, too, as it is very useful later.
Right Click to prepare your spear or javelin. Do not attack the animal directly with the javelin! Hitting an animal with a javelin deals far less damage than throwing it. Release in order to throw it. Be careful, as the animal will now try to attack you. Throw multiple spears in rapid succession, until the animal dies. In Terrafirmacraft+, animals drop as much meat as their body weight. This means that large animals will drop quite a lot of meat. You do not have to worry about picking up all the meat, as a few stacks will suffice for a few days. Be sure to pick up the Raw Hide, too, as it is very useful later.
If you are wounded, jump to the Wounds and Medicine section, then come back.
Собирательство

Crops spawn randomly in the wild between the seasons of spring and late summer, and have a chance to regenerate during those seasons every year. Breaking a wild crop will give only seeds if it isn't fully mature, so you should wait until it has reached the last stage of growth before harvesting if you want food. If you can find mature crops, they will serve as a good source of food.
Fruit trees and Berry Bushes can also be found in the wild. To harvest the fruit from a fruit tree or berry bush, ![]() Right Click on their leaves. Berry bushes can be picked up by breaking them, and placed elsewhere later on.
Right Click on their leaves. Berry bushes can be picked up by breaking them, and placed elsewhere later on.
These long-term food sources may be hard to find. Players are reminded that finding crops in Terrafirmacraft+ involves exploring a large area, much larger than required in vanilla - typically, the climate only changes if you travel about 1000 blocks away from an area. This may be confusing to players that are used to Vanilla, because Vanilla uses Biomes to determine the generation of resources, while Terrafirmacraft+ instead uses a climate system. Imagine that you are trying to find a different biome in Vanilla - if you cannot find these food sources, simply travel further, and rely on what you have to feed yourself while exploring. Despite this, it is completely possible to find these sources, and to sustain yourself for a long time.
Grain crops must be refined with a knife to make them into their edible version. This will also return straw.
| |
|
| |
| | |||
| |
In a pinch, mushrooms found in leaf litter can be cut with a knife to make them edible. Only brown mushrooms are safe to eat raw; red mushrooms must first be cooked.
Note: Do not break the leaves of the fruit trees! They take a long time to regrow.
Seeds can later be planted for a long-term food source.
If you have many stacks of food, you can stack them together. This can be done either by crafting the stacks of items together, or by hovering over one stack of food and pressing S (for "stack"). Food will eventually decay, and will have to be preserved for them to last longer. Decay can be cut off of food with a knife automatically by pressing D while your inventory is open, or by crafting the decayed food with the knife. Preservation methods will be discussed later on in this article.
Пчеловодство
- Main article: Пчеловодство
Wild Beehives occasionally generate on trees. Beehives are a source of Honeycombs, which are useful to make honey, which is a source of food, and also as a source of Wax for Candles. The player may also choose to make their own artificial beehives to gather more honey.
Players cannot open beehives directly. The bees will sting the player if they attempt to open or break the beehive. To calm the bees so that opening the beehive is possible, the player must light a Firepit underneath the beehive to calm the bees and allow the beehive to be opened. Wild Beehives have a Fertile Honeycomb in them; this can be used to create an artificial beehive, or can be cut to gather the honey inside. Once the Fertile Honeycomb is removed from the Wild Beehive, the beehive will collapse and drop some Empty Honeycombs; this can later be melted for Wax, which is an essential component of Candles.
| |
|
| |
| | |||
| | |||
The making of bowls so that you can remove the honey from the honeycomb is discussed later in this article, and the process of creating an artificial hive can be found at the Beekeeping article.
Костёр
- Main article: Костёр
At the end of the first day, you will probably want to create a firepit to make some torches, and cook any meat you've collected so you can eat it. You'll need at least five sticks, some logs to use as fuel, and optionally a piece of straw.
First, you'll need to put two sticks in the grafting grid in a diagonal pattern to make a firestarter.
| |
| ||
| | |||
| |
|||
Once you have a firestarter, throw (Default: Q) three sticks on the ground or other non-flammable block. Make sure they are all stacked on the same block, preferably in the middle. It's possible that your first few tries to light the firepit will not work. You can optionally toss an extra piece of straw in order to make the process faster. Once the firepit appears, drop some logs on to it to quickly add fuel. You can ![]() Right Click on the firepit as long as you aren't holding a firestarter or flint & steel to open its interface. The firestarter can later be upgraded by crafting it with a Bow to produce a Bow Drill, which has a higher effectiveness and durability.
Right Click on the firepit as long as you aren't holding a firestarter or flint & steel to open its interface. The firestarter can later be upgraded by crafting it with a Bow to produce a Bow Drill, which has a higher effectiveness and durability.
If the firepit goes out, you'll need to add some fuel and then ![]() Right Click on it with a firestarter to relight it. Relighting is instant.
Right Click on it with a firestarter to relight it. Relighting is instant.
Once you have a firepit, it is recommended that you make some torches. Torches can be easily lit by pressing ![]() Right Click on a lit Firepit while holding an unlit torch. A placed lit Torch can be used to light unlit torches in the same way.
Right Click on a lit Firepit while holding an unlit torch. A placed lit Torch can be used to light unlit torches in the same way.
| |
|
| |
| | |||
| |
|||
| |
![]() Right Click on a lit torch or lit firepit, or place and
Right Click on a lit torch or lit firepit, or place and ![]() Right Click with a firestarter or flint and steel to light the torch.
Right Click with a firestarter or flint and steel to light the torch.
Warning: Torches can set nearby flammable blocks on fire! They are not meant for indoor use if your shelter is made of wood or straw. Clear the nearby area of grass, undergrowth, trees, and leaves before placing down a torch. Use a Firepit instead to light up your shelter, and later upgrade to Candles.
Straw
Breaking tall grass with a knife yields straw. Straw is highly useful in the early game, as it can be made into shelter, storage, clothing, bandages, splints, and bedding.
Straw can be woven using the same knapping interface as rocks. To begin weaving straw, ![]() Right Click while holding at least five pieces of straw.
Right Click while holding at least five pieces of straw.
The Basket has 9 slots of inventory space. It will drop its items when it is broken. |
The Straw Cloak provides a moderate amount of cold protection. It is useful if you have spawned in a cold environment. |
The Straw Hat provides a slight amount of heat protection, and protects you from the heat of the sun. | |||||||||||||||||||||||||||||||||||||||||||||||||||||||||||||||||||||||||||||||||
The Grass Shirt provides a slight amount of heat protection. |
The Grass Skirt provides a slight amount of heat protection. |
The Grass Sandals give a small speed bonus when on sand. |
Straw can also be crafted into Straw Blocks, which are useful for building huts to hide from mobs at night.
| |
|
| |
| | |||
| |
| ||
Note: Players and mobs are able to move through straw blocks. You cannot use straw blocks to pillar up to safety, as you will simply fall through the block when you try to jump on it. Hostile mobs will not be able to spot you if you are already hiding in a straw block enclosure, but they are able to follow you through straw blocks if they have been aggro'd while you were outside of the straw block.

If you have a piece of Large Raw Hide, you can craft a Straw and Hide bed by placing two Straw Blocks adjacent to each other. Then, ![]() Right Click with the piece of Large Raw Hide in your hand while facing the straw blocks straight-on in order to create a Straw and Hide Bed. This can be used to skip the night. Be aware, through, that you might need to craft clothing in order to sleep in a Straw and Hide Bed, as it will be too uncomfortable to sleep in if you are too hot or too cold.
Right Click with the piece of Large Raw Hide in your hand while facing the straw blocks straight-on in order to create a Straw and Hide Bed. This can be used to skip the night. Be aware, through, that you might need to craft clothing in order to sleep in a Straw and Hide Bed, as it will be too uncomfortable to sleep in if you are too hot or too cold.
If you made it this far, congratulations. You have survived your first day in Terrafirmacraft+, and have the means to survive at night. Do take note that in TFC+, mob spawns are heavily increased, and it is not a good idea to be wandering around at night. It is recommended to stay near a firepit, and perhaps continue with Pottery, if you have a clay source nearby. You may now explore more long-term possibilities for survival, and progress towards the Copper Age.
Beyond The First Day
The days beyond the first day are focused on securing more tools for survival. You will also work your way towards leaving the Stone Age and entering the Copper Age, which will unlock more possibilities for long term survival.
Окружение и времена года
Instead of vanilla biomes, in Terrafirmacraft+ there is a climate system. Rainfall, elevation, distance from the equator, and time of year determine what types of animals, plants, and terrain will generate in an area. Players will always spawn in the northern half of the map, during the season of early summer.
Terrafirmacraft+ adds the four seasons to Minecraft. The seasons affect the ambient temperature, the behavior of animals, and the timing of sunrise and sunset. In winter, unharvested crops will turn back into seeds, trees will lose their leaves, and new saplings that are not evergreen will not grow. In spring, long grass, flowers, rocks, and saplings will regenerate. In summer, crops will respawn randomly over the world, and can be harvested for seeds. In autumn, trees will turn brown, and the ambient temperature will begin to fall. The player must prepare for the four seasons adequately, and the unique challenges that each provide, such as the heat of summer, especially if the player is in a tropical region, and preparing the cold of winter, by building shelter and sewing clothes.
Areas around the equator tend to be wetter and hotter, and eventually becomes tropical, then temperate, then boreal, and finally polar at 27000 blocks North or South.
Rivers generate along biome borders, and are much larger than Vanilla. Their riverbeds will contain clay deposits that will be useful if one spawns in a climate too dry to spawn clay.
Terrafirmacraft+ also introduces the idea of Regions. Instead of biomes, Regions are what determines what trees, plants, and animals spawns in an area. For example, Black-Eyed Peas can only be found in Africa. Along the edges of regions, huge mountain ranges will generate.
Гончарное дело

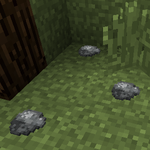
Clay generates near ponds and in riverbeds across the world. It can be distinguished from dirt from a distance by the existence of yellow Goldenrod flowers which only grow on clay. It can be dug with a shovel to obtain clay balls, which can then be shaped into clay items, and fired to make Pottery. Pottery is an important step of progression in Terrafirmacraft+, as it allows fresh water to be transported, Mud to be made, and to create vessels and Gold Pans.
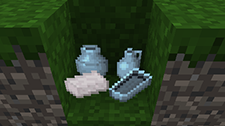
Clay, like Straw and Rocks, has a knapping interface for forming clay items. Hold five clay balls in your hand, and ![]() Right Click to access it.
Right Click to access it.
| |
||||||
The Ceramic Jug allows you to pick up water using |
The Ceramic Vessel has four slots of inventory space for small items. It is essential for progression to the Copper Age. Ceramic Vessels can only hold grains. |
The Ceramic Bucket is necessary for picking up water to create Mud. | |||||||||||||||||||||||||||||||||||||||||||||||||||||||||||||||||||||||||||||||||||
Ceramic Bowls can be used for the creation of Salads, or to craft a Gold Pan. |
Large Vessels are an early game Barrel. Large Vessels can contain 9 items, as well as liquids, and can be carried on the player's back. They can be mounted on a Firepit in order to melt items, such as Empty Honeycombs into Wax. Large Vessels are also a part of the Still. |
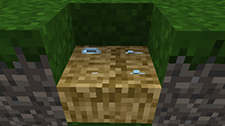
After you have made a clay item, it must be fired before it can be used. To do this, you will need to make a Pit Kiln.
Яма для обжига
To make a Pit Kiln, dig a pit in the ground, and ⇧ Shift + ![]() Right Click the items to be fired into the pit. Then, add eight straw, then eight logs, by right clicking on the pottery.
Right Click the items to be fired into the pit. Then, add eight straw, then eight logs, by right clicking on the pottery.
- The pit kiln will not work as pictured below. These images are in cross section, with the required surrounding blocks removed for visibility.
⇧ Shift+
 Right Click the items into the pit
Pit kiln with added straw
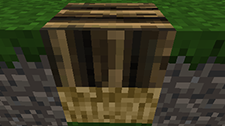
Complete pit kiln


The Pit Kiln can now be lit with either a Firestarter or a dropped torch. Lighting a pit kiln using a torch will produce sparks that might burn flammable blocks nearby, so be careful where you build your pit kilns.
The Pit Kiln will take eight hours to complete. Once it is complete, you can ⇧ Shift + ![]() Right Click the items out of the pit kiln. The items can now be used.
Right Click the items out of the pit kiln. The items can now be used.
Шитьё

Sewing can be used to craft Raw Hide Bags for carrying around more items, and to create more advanced clothing from materials like Fur.
To begin sewing, one needs a Bone Needle. Bone Needles can be made by repeatedly punching a Stone Block with a bone in your hand. It is recommended to have several bones, as not every bone will drop a Bone Needle. Once a Bone Needle is produced, it can be threaded with a thread, such as Sinew (from killing animals).
| |
| ||
| | |||
| | |||
Leather and the various cloths can be cut into clothing pieces. ![]() Right Click with the clothing pieces with a threaded bone needle in the inventory to show the sewing GUI. Place the necessary clothing pieces into the slots. An image of the clothing will appear. Use the Threaded Bone Needle to trace the thread around the red lines in the image. Using
Right Click with the clothing pieces with a threaded bone needle in the inventory to show the sewing GUI. Place the necessary clothing pieces into the slots. An image of the clothing will appear. Use the Threaded Bone Needle to trace the thread around the red lines in the image. Using ![]() Right Click with a knife on the image will remove a section of thread. Once the red lines on the image is completely traced correctly, and all incorrect parts of the tracing are removed, the completed clothing will appear in the output slot.
Right Click with a knife on the image will remove a section of thread. Once the red lines on the image is completely traced correctly, and all incorrect parts of the tracing are removed, the completed clothing will appear in the output slot.
A Raw Hide Bag is crafted with two Hide Bag Pieces, which can be cut from Raw Hide.
| |
| |||||
| |
|
|
| ||
Раны и Медицина
In the course of playing, you may get wounded. These are represented by the Cut, Bleeding, Wound, and Fracture status effects. These wounds can be mitigated through the use of medicine. There are several types of medicines. Cuts and Wounds can be healed with bandages but will eventually heal on their own, while Fractures require splints to heal, and will never heal without them. Getting hurt while wounded might make the wounds you already have more severe.
To craft some crude bandages, you will need some straw and some tree resin. Once you've crafted the bandages, hold them in your hand and hold right click to start applying them. A single crude bandage will set the time remaining on the wound to 30 seconds, and is enough to treat minor wounds and bleeding.
| |
|
| |
| | |||
To craft a splint, you need a stick and a piece of any string. A early-game version of string, Straw Cordage, can be made by weaving straw. Alternatively, any kind of string will do, even sinew from an animal. Once you've crafted a splint, hold it in your hand and hold right click to start splinting your fracture. A single splint should be enough for minor fractures, and will remove the movement penalty from the fracture itself while allowing the timer on that fracture to tick down. A fracture's movement speed reduction can also be mitigated through the use of a wooden staff, which can be crafted with a pole and a piece of resin. Holding the staff while walking will allow you to walk normally, ignoring the movement speed reduction as long as the staff is held.
| |
| |||||
| |
|
| |
| | |||
| |
| ||
| | |||
| | |||
You can check if a wound has been healed by opening your inventory and looking at the status effect panel: if it displays a lowercase "t" near the wound, it means the wound has been treated and is healing. In case your wounds are more severe and a single bandage or splint is not enough, you can just keep applying bandages or splints as needed. Note that each medical item will only heal one wound, so if you had a Wound and a Cut at the same time you'd need to use at least two bandages.
Storage
You may now have gathered too many items to carry around in your inventory. Unlike Vanilla, in TFC+, chests are locked behind metal saws. In the early game, one must resort to alternatives.
One of the easiest to make storage items is the Straw Basket. It can contain 9 slots of solid items, but cannot contain liquids. Large Ceramic Vessels and Ceramic Vessels can be crafted from Clay. The Large Ceramic Vessel can contain liquids or 9 slots of solid items. Ceramic Vessels are portable, and can contain four slots of small items, meaning items that are too big for it will not fit. The Raw Hide Bag can contain six slots of items.
Shelter
By now, you will have established your tools, have some food, and have portable fresh water to explore the world. You will now want to establish your shelter so you have somewhere to hide at night.
Choosing a Site
You will want to equip yourself with a few jugs of water and some Food. Explore the world for a suitable site. The best sites have certain traits that you may want to look out for.
Stone and Metal
| Copper Ore | ||||
|---|---|---|---|---|
On the surface, ore nuggets will spawn. These indicate the existence of a ore vein underground (up to 35 blocks deep). Settling close to these ore nuggets will allow easy access to metal to mine later on.
Several stone types spawn materials that are more useful. One consideration is Flux Stone, which turn into Flux. Flux is necessary for binding metal ingots together while smithing. Any material made of Flux Stone, such as Gravel, Sand, or Rock, can be made into Flux. Thus, if a beach spawns Dolomite sand, you will be able to make that into Flux Stone.
| Flux Stone | |||
|---|---|---|---|
| |
|
|
|
If you do not settle near flux stone, you will need to gather seashells in order to make flux. This might be time consuming.
Trees
Wood is important for charcoal and as building and crafting material. Proximity to trees is almost necessary. Not settling near trees also means you might be in a dry area, which might not spawn clay.
Clay
Clay is important to create molds for tools and ingots, as well as Ceramic Roof Tiles. An area not having clay also means you are in a dry area, and there likely will not be easily accessible clay anywhere nearby.
Water
In Terrafirmacraft+, one cannot place water source blocks unless they have a Red Steel Bucket. This makes access to both fresh water and sea water important. Fresh water can be drunk and is important in certain crafting recipes. Seawater can be made into Brine to preserve food. Both types of water can be used to create farms, which are an important long-term source of food.
Climate
In cold climates, you will need to prepare for Winter. In Winter, crops will not grow, and you will have to deal with the body temperature by crafting clothes. Likewise, in hot climates, you will need to prepare for the heat of Summer. It is recommended to settle in a cold climate, as cold protection clothing is easier to craft.
Mud
- Main article: Mud
Mud in Terrafirmacraft+ is a mixture of wet dirt and straw. The blocks made from mud are very useful for early-game shelter, as they are solid, and not affected by gravity. This makes mud one of the most versatile early game building materials.
Making mud requires a fired Ceramic Bucket. Collect dirt and straw, and drop it on the ground in a one-to-one ratio, then ![]() Right Click with a ceramic bucket on the items to create Mud.
Right Click with a ceramic bucket on the items to create Mud.
 Саман
Саман
Mud brick is created from crafting the mud directly in the inventory crafting table.
| |
| ||
| | |||
Mud brick must be dried before it can be used to build. Mud bricks can be dried by placing them using ![]() Right Click on the ground exposed to the sun during the day. Once the mud brick is dried, craft them into Mudbricks, which can then be used to build.
Right Click on the ground exposed to the sun during the day. Once the mud brick is dried, craft them into Mudbricks, which can then be used to build.
| |
|
| |
| | |||
| |
| ||
One thing to note is that mudbrick is sensitive to water, and will turn back into dirt when it is raining. To prevent this, you will need to place a block above it to protect it from the rain, such as the Thatch Roof.
 Мазанка
Wattle and daub is another way of building with mud. Unlike mud bricks, it will not dissolve in the rain.
To make wattle and daub, start by making the wattle upon which you will daub the mud:
| |
|
| |
| | |||
| |
| ||
Then, place the Wattle where you want the blocks to be. ![]() Right Click with the mud to daub the mud over the wattle, and the wattle will turn into Wattle and Daub.
Right Click with the mud to daub the mud over the wattle, and the wattle will turn into Wattle and Daub.
Stacked Logs
Four regular logs can be crafted into one stacked log. This can be used to build log cabins.
| |
|
| |
| | |||
| |
| ||
Log Piles
Log Piles can also be used as construction blocks. However, another log pile cannot be placed above another log pile that is not full. This makes Log Piles a rather expensive construction block.
Roofing
You may want to make a roof for your building. TFC+ provides specialized roof blocks, which are solid diagonal blocks that also provide protection from the climate when a player is under them. An early game roof block is the Thatch Roof, made using two straw blocks and a stick. Roofs attach to solid blocks, such as log piles.
| |
| ||
| | |||
| |
| ||
Земледелие
Farming is a good long term food source. In Terrafirmacraft+, agriculture is slightly different from vanilla. Crops will not be destroyed if you jump on them. Terrafirmacraft+ introduces the idea of nutrients. Crops require nutrients in order to grow. Grass blocks that are tilled will turn into farmland with full nutrients, while dirt blocks will have to be fallowed for a while before crops can be grown on them. Different crops will require different nutrients. The nutrient each plant needs can be checked once a player is skilled enough in Agriculture. Crops will gradually use up their particular nutrient - thus, it is recommended to switch the places of where in the farm you grow a certain crop every harvest. Only freshwater can be used for hydrating the soil; however, crops will grow regardless of whether they are hydrated or not.
Along with Food crops, there are Fiber crops and Dye crops. Fiber Crops, such as Agave, Cotton, Flax, and Jute, can be made into Fiber, which in turn can be made into String. Dye Crops, such as Madder, Weld, and Woad, are used for creating liquid Dye that can be used to dye clothing.
In the Stone Age, a hoe can be used to turn dirt into farmland, check the hydration status, and the harvest state of the crop. These three modes can be cycled using the mode key (Default: M). Once a player is skilled enough in Agriculture, they will be able to check the nutrient status of the farmland, as well.
| |
| |||||
Like every other tool, a Stone Hoe must be attached to a Stick or Bone before it can be used.
![]() - Mode Indicator
- Mode Indicator
![]() Preparation - Standard use, tilling soil into farm-plot.
Preparation - Standard use, tilling soil into farm-plot.
![]() Water - Highlights the target farmland with black: no water access, and blue: water access.
Water - Highlights the target farmland with black: no water access, and blue: water access.
![]() Harvest - Highlights the farmland with a green display for finished crops and red for those whom are still growing into maturity.
Harvest - Highlights the farmland with a green display for finished crops and red for those whom are still growing into maturity.
Seeds can be Foraged from wild plants by breaking them. Once you have the seeds for a particular crop, they can be planted on farmland by ![]() Right Clicking while holding the seeds. The crop will take a few in-game months to grow. You can ascertain that a crop can be harvested with the Harvest mode of the Hoe.
Right Clicking while holding the seeds. The crop will take a few in-game months to grow. You can ascertain that a crop can be harvested with the Harvest mode of the Hoe.
Животноводство
- Main article: Животноводство
In order for a long term source of meat, as well as to obtain Wool, Milk, and Hide, animals can be tamed and bred in Terrafirmacraft+. Refer to the Animal Husbandry page for more.
Extras
There are many other things you can do in Terrafirmacraft+. This guide only covers the essentials. In the new player's interest, here are other things you can do:
- Make Candles, for a safe source of light that does not pose a fire risk;
- Glassworking, in order to create unbreakable drinking bottles. The Blowpipe, used to make Glass Bottles from Molten Glass, can also be used to make a fire hotter.
- Alcohol, for creating Vinegar and for experience levels;
- Leatherworking, to convert Raw Hide into Leather
- Build an Walk-in Kiln to kiln more items at once
- Upgrade to better Roofs
- Make and play Musical Instruments
- Make Plaster of Paris
- Smithing
- Make a Protection Meter to measure the amount of Spawn Protection around you
- Make a Saddle to ride Horses
- Make a Wooden Staff to walk around quicker
- Make better Weapons such as the Bow.
- With a Saw made of Metal, make Lumber, which can be used to craft many wooden items, such as Wooden Planks, Barrels, and Chests.
- Craft a Loom, weave Cloth, and craft better Clothing in order to survive winter.
- Craft a Burlap Sack from Jute or Sisal (Agave) fiber, to preserve non-grain food.
- Craft a Quiver to store many Javelins and Arrows
- Craft a Composite Bow, an upgraded and more powerful bow
- Do Beekeeping for honey
Leaving the Stone Age
Congratulations! You have made it to the end of the Stone Age. The next step will be to cast a pickaxe using molten copper, mining more copper, and creating a copper anvil that you can smith copper tools on. If you have followed the Choosing a Site guide, you will have settled near a source of copper. The Metalworking Guide will aid you through the Copper Age and beyond.